In a Lawson Cloud environment, its difficult to get logs off the server since now you’re likely restricted to FTP access and the latest logs are currently being written to by the server itself, thus throwing a deny exception when trying to download the latest logs from FTP.

I previously made another article on this explaining a work around for this but that takes a few extra steps and time. This is a quicker command line method if you need to test something immediately.


  1. First login to Lawson Interface Desktop
  2. Go to the directory in which the logs exist
  3. Type this command: tail -500 <name of log file being written to> | lashow
  4. Example: tail -500 ios.log | lashow

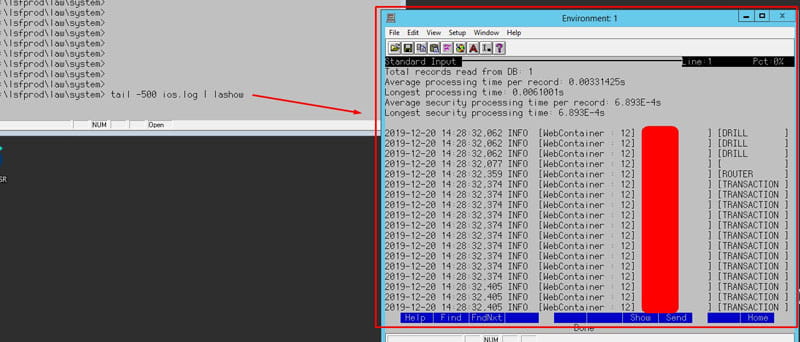
As you see above, this uses the tail command combined with -500 parameter which returns the last 500 lines written to the log. You can change -500 to whatever amount of lines you want to return (the more the longer it takes to load)

The optional piped LASHOW command is to open this in a separate scrollable and searchable window within LID.

This becomes especially useful when testing live forms or code in Lawson.


Good luck!

The Landmark Admin Node can be used to run command line utilities on the Landmark Server.  In the node properties, select the command you wish to run.  Then click Build and provide the parameters to be used in your command.


This is one of those Lawson errors that could waste a morning of work looking through the Infor knowledge base, analyzing/changing security, and or reviewing logs.


So, you’re on PO20.1 and want to make a change to a PO entry and get this error:

To resolve this is actually incredibly simple and can be changed on PO04.1 at the bottom of the Buyer Information Tab (your settings may be different based on your needs):

If you happen to get a similar issue for a requisition cost change “Requester not authorized to change unit cost”, simply go to RQ04 and allow unit cost override for the specific requester (your settings may be different based on your needs):

There are a couple of different ways to disable an IPA schedule to stop it from running.  One way is to disable the process itself.  To do that, open User Defined Processes (Start > Process Server Administrator > Configuration > Process Definitions > User Defined Processes).  Select the process being disabled and clear the “Is Process Enabled” flag.  It is important to note that this method will cause the schedule to go into an error mode, and will have to be cleared and requeued when you are ready to start the schedule back up.

The other way is to set the Latest Time to Run on the schedule.  I like to set it to some date in the past (like yesterday) to make absolutely sure the schedule won’t run again.  When you click Save, the next time to run dates will clear.  To start the schedule back up again, simply clear out the Latest Time To Run and save the schedule.

To view/edit your own schedules, log into Rich Client and navigate to Start > My Actions.

To view/edit ALL schedules, log into Rich Client and navigate to Start > Applications > Async Framework Components > Requests.  From there, you will be presented with a list of all Async Action Requests.  The IPA process schedules are under module “pfi”.


To trigger a process manually, you first have to set up a trigger.  From Rich Client, navigate to Start > Process Server Administrator > Scheduling > By Process Definition.  Click Actions > Create to create a new trigger.  For Process Name, select the IPA process that you want to run.  Enter a descriptive Work Title (the trigger will fail if it doesn’t have a Work Title).  Click Save.  Then, click Actions > Start.  Check the Work Unit log to see that your process has run!  If you want to delete your trigger, you will first need to delete the work units associated with it.

To activate the time zones available in your Landmark applications, from the GEN data area, go to Start > Configure > Application.  Under “Data Area” in the left panel, select “Time Zones”.  Find the Time Zone(s) that you want to activate, and double-click to edit.  Set the “In Use” flag.  Now that Time Zone will be available to select in your Landmark applications.

The Landmark Configuration Console allows you to effect system-wide changes with no downtime for your users.  You can personalize your Landmark applications in a multitude of ways:

  • Add custom fields
  • Move fields or remove them from forms
  • Set fields to required
  • Modify list columns (add/remove/rearrange)
  • Create new
    • User interfaces (pages, lists, etc)
    • Business classes (data, objects, etc)
  • Security
    • Use the Security Configuration tool to modify security classes, rules, and roles
  • Web Services
    • External systems communication with Landmark business classes using SOAP, HTTP, WSDL, or REST

The Infor-delivered role what will allow users to access Configuration Console is GlobalUIConfigAccess_ST.  The role that will allow users to access Security Configuration is SecurityConfigAccess_ST.

When you are using IPA to transfer files, there may be some cases where you need to pick up multiple files, or where you need to get files for which you only know a partial name (such as a file that contains a date/timestamp).  To get multiple or masked files, you can supply an asterisk (*) in the filename as a wildcard.  Then, the destination file should actually be a directory name (of a directory that exists).  All files that are picked up in the FTP process will be placed in that directory, and you can use them from there.


The Lawson database relationships are stored in the GEN database.  Foreign key constraints are not actually added to the database tables.  So, to see what these relationships are, you can query the GEN data.  The primary relationship information is stored in FILEREL.  Then, to get the fields that are used in the relationship you’ll need to join FILRELFLD and FILEINDFLD.  FILERELFLD contains the primary field names, and FILEINDFLD contains the foreign field names.  The below query is a sample run against a SQL Server database for a data area called “TEST”.


SELECT RTRIM(FILEREL.FILENAME) PARENT_FILE,

RTRIM(FILEREL.RELFILE) CHILD_FILE,

REPLACE(RTRIM(FILERELFLD.FRFLDNAME), ‘-‘, ‘_’) PARENT_FIELD,

REPLACE(RTRIM(FILEINDFLD.FLDNAME), ‘-‘, ‘_’) CHILD_FIELD

FROM FILEREL INNER JOIN

FILERELFLD ON FILERELFLD.FILENAME = FILEREL.FILENAME AND

FILERELFLD.RELNAME = FILEREL.RELNAME INNER JOIN

FILEINDFLD ON FILEINDFLD.FILENAME = FILEREL.RELNAME AND

FILEINDFLD.INDEXNAME = FILEREL.INDEXNAME AND

FILEINDFLD.FLDNBR = FILERELFLD.FLDNBR INNER JOIN

FILEDEF ON FILEDEF.FILENAME = FILEREL.FILENAME

WHERE FILERELFLD.FRFLDNAME <> ‘              ‘ AND

FILEREL.PRODUCTLINE = ‘TEST’