In Lawson portal, you may have a user with several dozen favorited Lawson forms and a new user coming in will inevitably have a hard time maneuvering the software. To simplify this process, you can simply copy one users’ favorites to another if you have direct access to the Lawson LSF server folder directory.
First login to your LSF server.
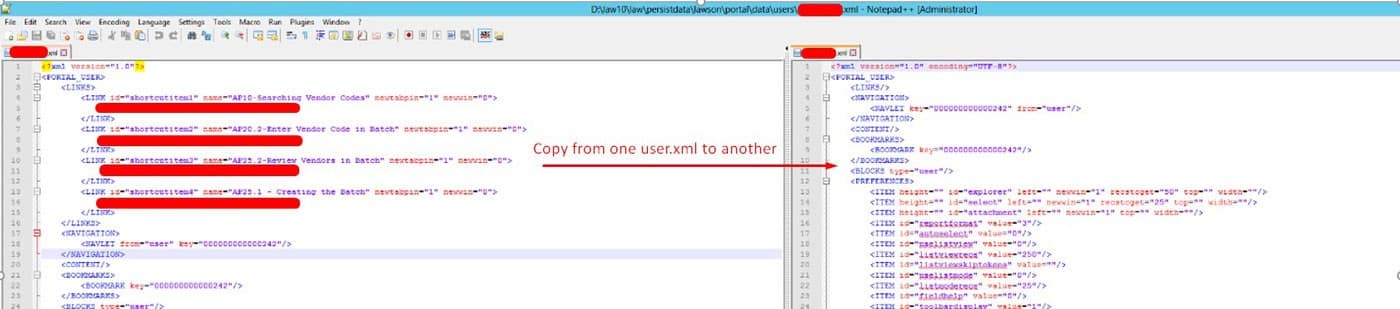
Go to %LAWDIR%\persistdata\lawson\portal\data\users
Locate and open the username of the person you want to copy the favorite URLs from. The format will be in xml Example: username.xml
Now Locate the username.xml you want to copy to.
Simply copy and paste from one username.xml to the other username.xml as shown below:
Save the XML file, login to Lawson Portal as an Admin user and clear IOS cache. Notify the user to clear their browser cache as well and to relog into Lawson Portal. They should now see all the copied Favorites!
https://www.nogalis.com/wp-content/uploads/2020/04/How-to-Mass-Copy-Lawson-Portal-Favorites-from-one-user-to-another.jpg470470Angeli Mentahttps://www.nogalis.com/wp-content/uploads/2013/04/logo-with-slogan-good.pngAngeli Menta2020-04-23 08:29:442020-04-23 09:37:57How to Mass Copy Lawson Portal Favorites from one user to another
You may have a report in LBI that you want to create historical instances of as well as refresh data from time to time. Let’s go over how to do this.
Login into LBI as an admin user and go to Reporting Services Administration
Go to Maintain Reports and open the report via the [Details] link next to the report name.
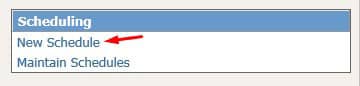
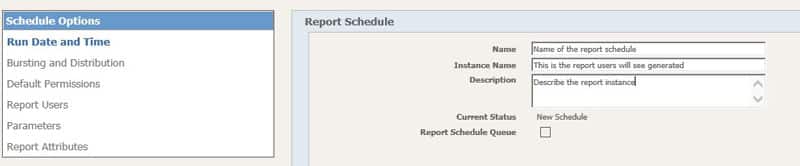
In the report under Scheduling, select New Schedule
Under Run Date and Time fill in the:
Name (schedule name)
Instance Name (name of generated report), you must manually re-schedule if you want to include specific unique information in the name like date.
Description
Under Time and Frequency:
Set the Scheduled Run Time (time of day)
Time and Frequency
Schedule for days in a Week – This will run for every day in the week you select regardless of date.
Schedule for days in a Month – This will run the day you select in a month. Please note that there are specific check boxes for First and Last day in the month. If a month does not have a day like the 30th or 31st, it will skip that month.
Effective Date Period
Effective start date: This date must be set after current date and time.
Expiration date: The report will no longer run this schedule after this date and time.
The remaining Schedule Options should typically mirror the report options. Any customizations will not change the base report.
https://www.nogalis.com/wp-content/uploads/2020/04/How-to-create-an-Lawson-Business-Intelligence-LBI-Report-Schedule.jpg470470Angeli Mentahttps://www.nogalis.com/wp-content/uploads/2013/04/logo-with-slogan-good.pngAngeli Menta2020-04-20 07:39:012020-05-17 18:28:50How to create a Lawson Business Intelligence (LBI) Report Schedule
LDAP Signing (LDAPS) provides a way of securing traffic between your applications and AD LDS or Active Directory. In the second half of 2020, Microsoft plans to release a patch that will enforce LDAPS traffic by default. You can get more information about the Microsoft KB here.
What does this mean for my applications?
Well, even if you are using AD FS for authentication, your applications will be impacted. Some pieces of Lawson, such as BPM, are still going to be bound to LDAP, as is the Rich Client login for Landmark. Also, Lawson still communicates with AD LDS, so that would be impacted as well. Note that if you are using IBM’s Tivoli Directory Server (IBMTDS) for your Authentication Data Store, you will not need to make any changes to the Authentication Data Store. However, you will need to make the LDAP Bind changes for any of your applications that use LDAP Bind.
What will happen if I don’t prepare?
If you don’t configure your Lawson and Landmark environments to accept LDAPS traffic, then you will experience some application failures in these areas:
LASE will fail to start
Logins that use LDAP bind will no longer be able to communicate
Lawson Security Administrator
BPM
Microsoft Add-ins
Landmark Rich Client
IFS will no longer be able to sync users from Active Directory
When is this happening?
Microsoft has said they will release the patch that enforces LDAPS in the latter half of the year. They already released a patch in March that includes additional auditing and logging, and allows for enforcement via Group Policy. This update will not have a direct impact on your applications, and it is safe to take the update any time.
When should we make the configuration changes?
You can make the changes now, or any time before you take the LDAPS enforcement patch. There is not a negative impact on your applications if you make the changes now, and in fact, it is recommended that you do them as soon as you can.
Are any other applications affected?
No, the only applications affected are those that use LDAP Bind, or communicate with AD LDS. Applications like LBI or MSCM, which use DSP for authentication, will not be affected in any way.
What do we need to do?
Glad you asked! Here is a step-by-step guide for configuring your Lawson and Landmark environments for LDAPS. (NOTE: It is important that you follow these steps in order!! All of the certificate work MUST be done before the Lawson/Landmark configurations are done. Also, this document will indicate whether the work needs to be done in LSF only, Landmark only, or both.)
Prerequisites
Here is what you will need before you get started.
SSL certificate for the AD LDS server with the private key (.pfx) included
Note: Certificate must contain a SAN (Subject Alternate Name)
Can be an existing wildcard cert, or the cert already installed on your LSF server (if it meets the requirements)
You will also need to know your private key password for the cert
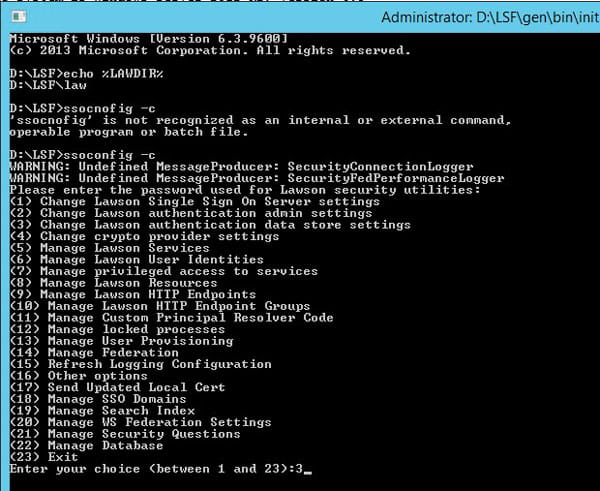
ssoconfig password
LDAP Bind password
This is the password for the user in the LDAPBINDDN setting in your LAWDIR\system\install.cfg file
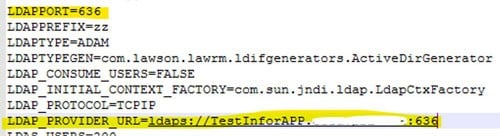
Verify the port you are using for LDAPS (typically 636 or 3269)
636 is the standard SSL, 3269 is the Global Catalog Port
Global Catalog is preferred when the LDAP servers support it
Take snapshots of all your servers. Just do it!
LDAP Certificate – AD LDS
This procedure only has to be performed on the server that hosts AD LDS (most likely your LSF server).
1 – Add the LDAP Certificate to the AD LDS Service
Identify the AD LDS service instance in your Microsoft Services list
Also make note of the account that is running the service for later use
Launch MMC (Microsoft Management Console)
Choose File > Add/Remove Snap-In
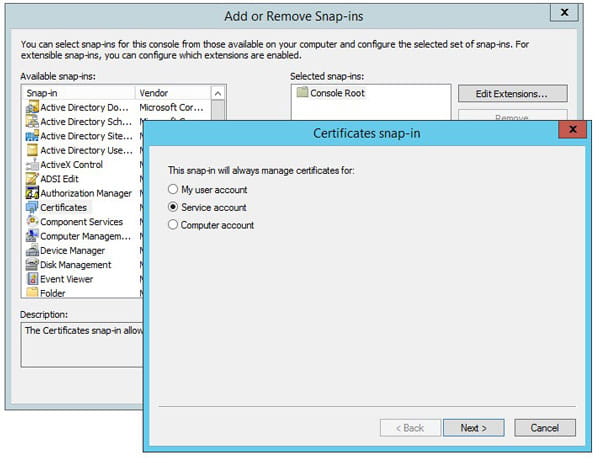
Add the certificates Snap-In
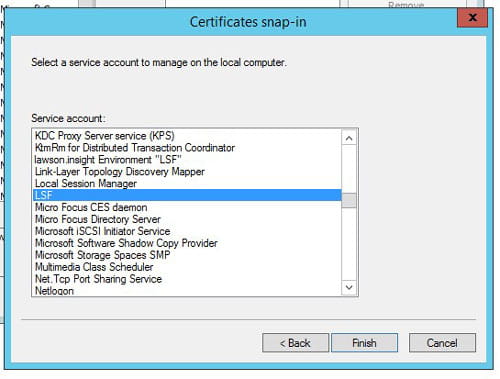
Choose “Service” account and click “Next”
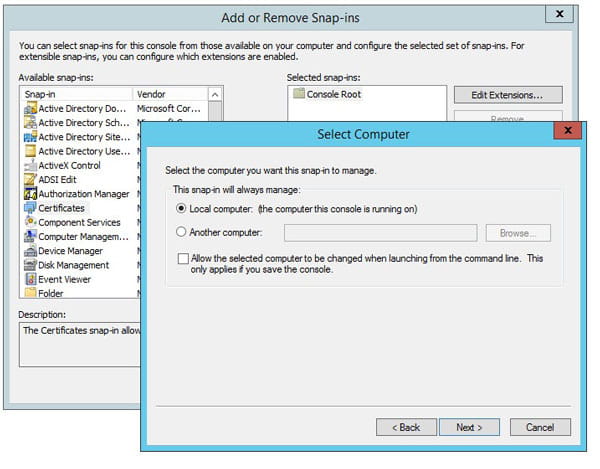
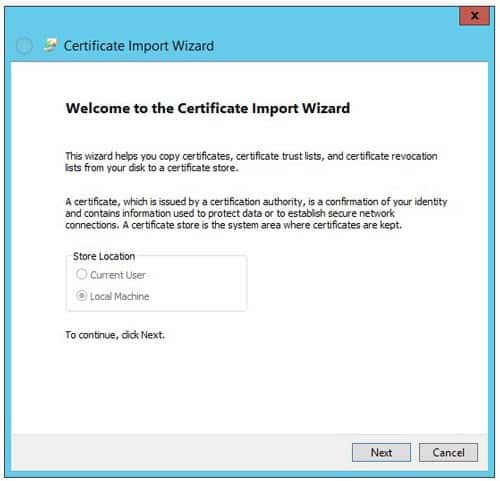
Choose “Local Computer” and click “Next”
If you are not on the computer hosting AD LDS, then chose “Another computer” and provide the server name
Choose the Service Account you identified above and click “Finish”
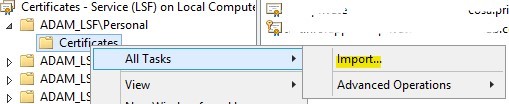
Right-click on the service that was added and select “All Tasks > Import”
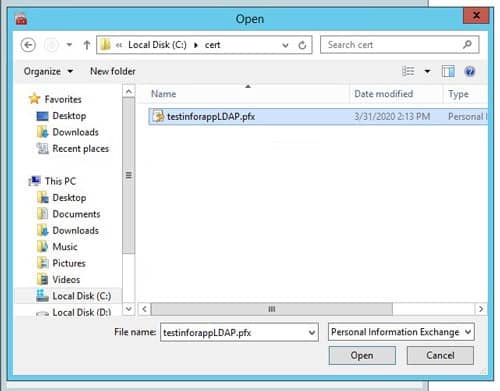
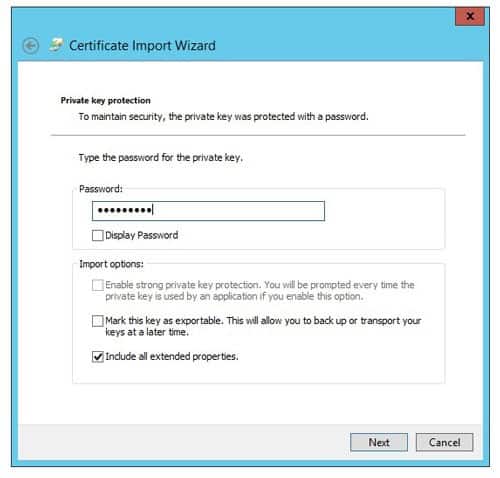
Click next and browse to the .pfx certificate file. Click “Next”
Enter the private key password
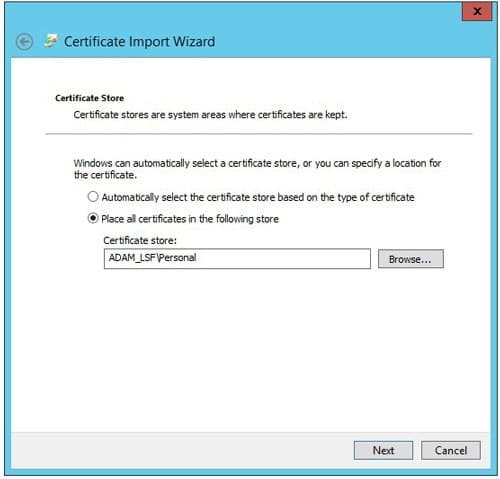
Place the certificate in the Personal store for the AD LDS service
Click Next then Finish
2 – Export Certificate (.cer) file
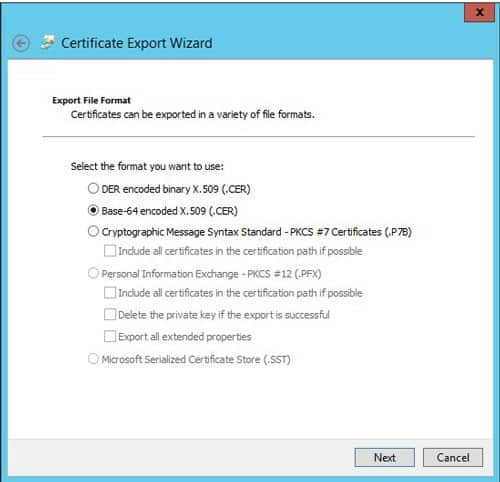
Export the certificate as a Base-64 encoded X.509 (.cer) for the OS and WebSphere Java updates.
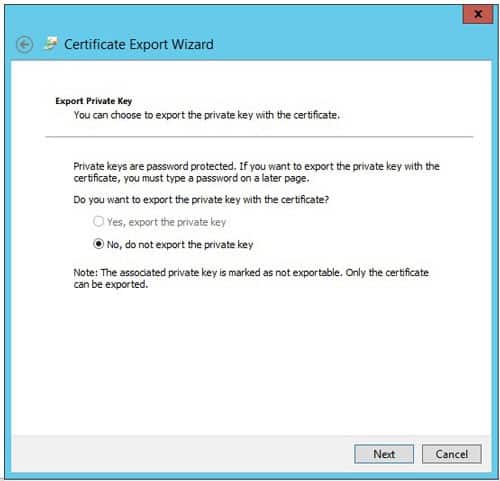
In MMC, right click the certificate > All Tasks > Export and click Next
Do not export the private key
Choose Base-64 encoded X.509 (.cer) and click Next
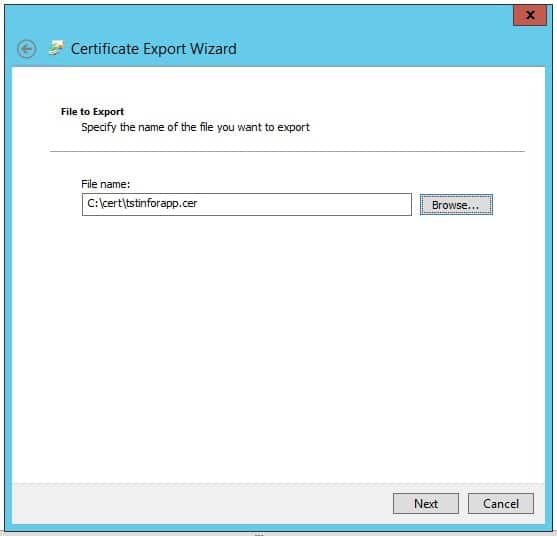
Choose a location to save the file for later use
Click finish
3 – Grant Permissions on Certificate Container
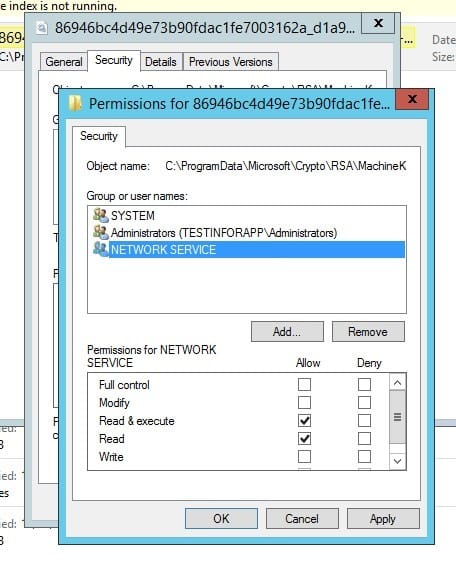
This is where you will need the service account that is running the AD LDS service (you made a note of that earlier). That user needs to be granted Read and Read & Execute permissions on the Unique Container file, as well as the Machine Keys directory.
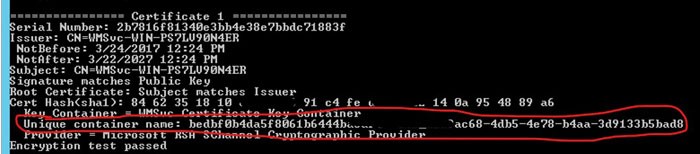
From an administrator command window, run command certutil -store MY
Find the LDAPS cert(s) by comparing the cert hash to the thumbprints on the certificate properties in MMC
Make note of the Unique Container Name
Navigate to the “Keys” or the “MachineKeys” folder
This can be found in multiple places depending on your server configuration
Some possible locations: C:\ProgramData\Microsoft\Crypto\RSA\MachineKeys or C:\Documents and Settings\All Users\Application Data\Microsoft\Crypto\RSA\MachineKeys or C:\Documents and Settings\All Users\Application Data\Microsoft\Crypto\Keys
You could also do a file search for the unique container name
Grant Read and Read & Execute permissions on the Keys/MachineKeys directory AND the Unique Container file
NOTE: if you have a nested certificate, you may have more than one unique container file. Grant permissions on all of the containers related to your LDAP Cert.
Stop the LSF environment service
Restart the AD LDS service
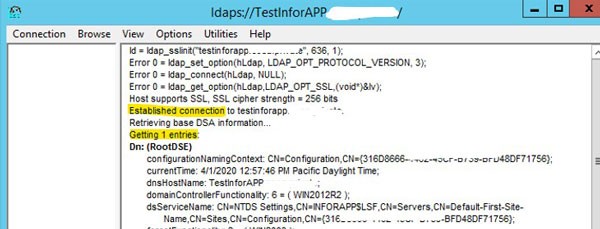
4 – Smoke Test
Open the ldp.exe tool
Type the server FQDN, SSL port, and check the SSL box
Click “OK”
Make sure a connection is established, and the tool finds an entry
Do not proceed until you have a successful smoke test
Hint: If the ldp.exe tool has any trouble connecting, there will typically be some helpful error messages in the Event Viewer
LDAP Certificate – WebSphere
This procedure needs to be performed for both the Lawson and Landmark instances of WebSphere.
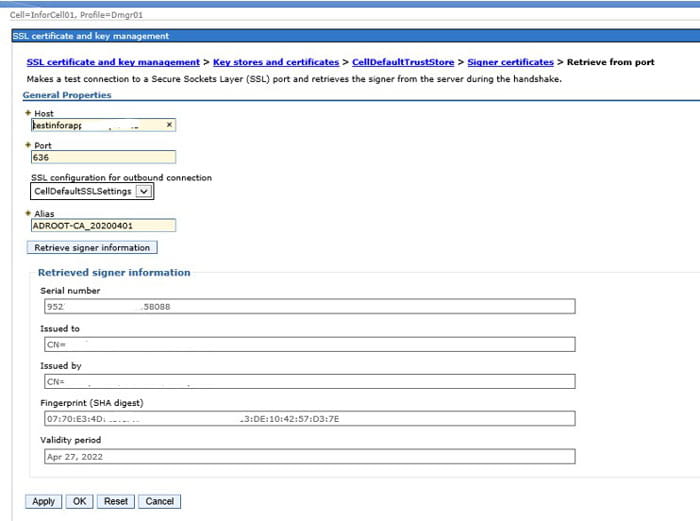
In this procedure, you are going to update the Default Trust Store on both the Cell and the Node in WebSphere. These instructions demonstrate how to get the LDAPS certificate into WebSphere using the “Retrieve from port” button. It’s the simplest way, but you do also have the option of manually adding the certificate file (.pfx) in each store.
Access the WAS Admin Console and navigate to: Security > SSL certificate and key management > Key stores and certificates
Click the CellDefaultTrustStore > Signer certificates
Click the Retrieve from port button.
Host: <the server where your LDAPs certificate was added to the AD LDS service>
Port: <the port that your network team is using for LDAPS>
Alias:<give it a meaningful name>
Click Retrieve signer information.
Once you click “Retrieve signer information”, the bottom of the form will be populated with information about your certificate.
Click OK & save changes.
Synchronize the nodes
Perform these same steps for the NodeDefaultTrustStore
Remember to do this in your WebSphere environment for both Landmark AND Lawson!
LDAP Certificate – Java
This procedure needs to be performed on both the Lawson AND Landmark servers.
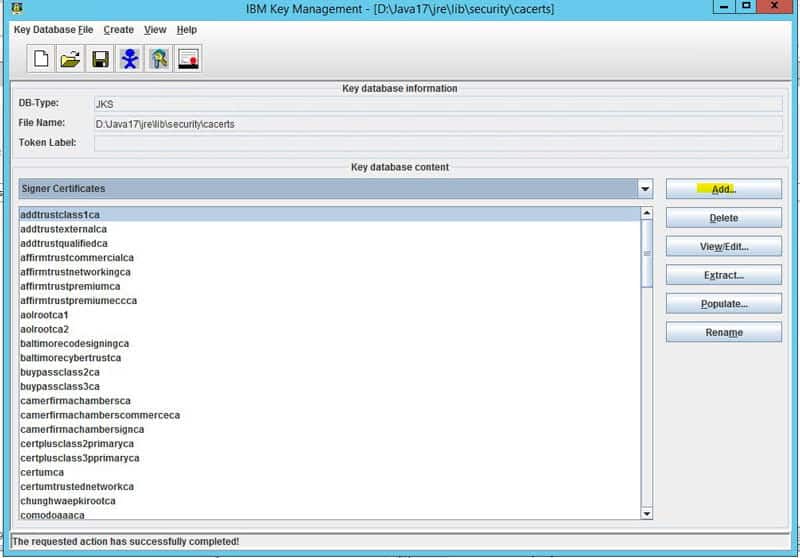
Adding certificates to the Java store can be done using either the ikeyman GUI utility, or the keytool command line utility. The below instructions will demonstrate both methods. Whichever utility you use, the procedure is the same for both OS Java and WebSphere Java.
1 – Add Certificate to OS Java (ikeyman example)
This is the Java instance that is used by LSF or Landmark. Here is an example of updating cacerts using the ikeyman utility.
Set environment variables (<APPINSTALLDIR>\enter)
Run command “where java” to determine where LAW_JAVA_HOME is located
NOTE: You may have multiple instances of Java, and you need to make sure you apply the cert to all of them!
Back up file LAW_JAVA_HOME\jre\lib\security\cacerts
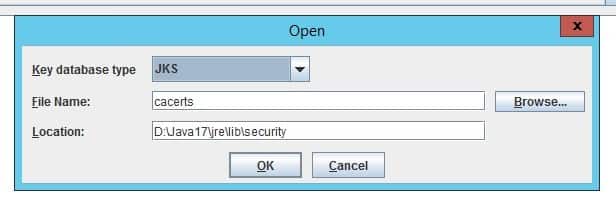
Run the ikeyman utility at WAS_HOME/bin
Open the LAW_JAVA_HOME/jre/lib/cacerts file and select the Key database type of JKS
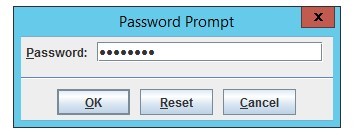
Type password “changeit”
This is the default password for the Java certs files
Select “Signer Certificates” in the dropdown
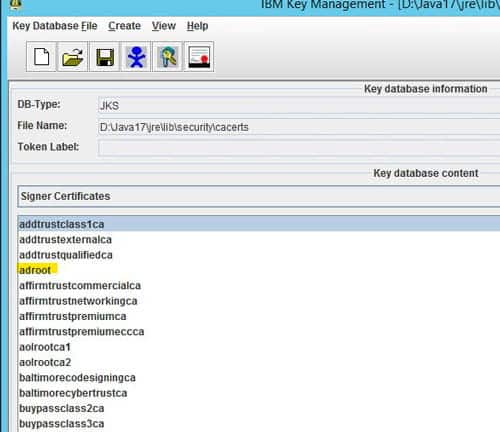
Click “add” and navigate to the ldap certificate exported earlier
Give it a meaningful name
2 – Add Certificate to WebSphere Java (keytool example)
This is the Java instance that is installed with WebSphere. Here is an example of updating cacerts using the keytool utility. NOTE: You will most likely have more than one Java folder in the WebSphere install directory. It is important to update all instances.
Find your WebSphere Java directories (may have multiple)
Located at WAS_HOME
“Base” java and version-specific java (i.e. WAS_HOME/Java and WAS_HOME/Java_1.7_64)
Make note of these directories
Back up the file(s) WAS_JAVA_HOME/jre/lib/security/cacerts
Add signer certs using keytool command line utility
Open an administrator command window
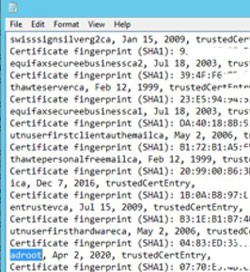
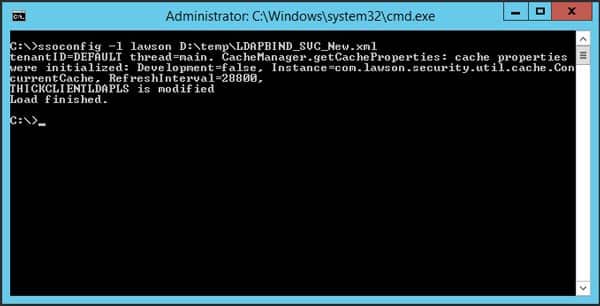
Get a list of the existing certs and validate using command
Log into Lawson and perform a couple of inquiries/batch jobs
Landmark Configuration Changes
This procedure is performed only on the Landmark Server
1 – Update LDAP Bind Settings
Launch Rich Client for the gen data area
Search for Login in the search box
Double click the Login Scheme business class
Search for the LoginScheme that is associated with the LDAP Bind Service (you may have more than one)
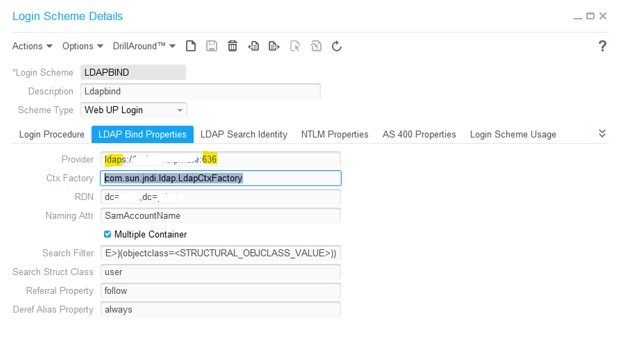
Double click on the LoginScheme to open the properties screen
Click the LDAP Bind Properties tab
Click on the LDAP Bind Properties tab
Update the port and protocol on the Provider entry
Save the update
Restart the Landmark Server
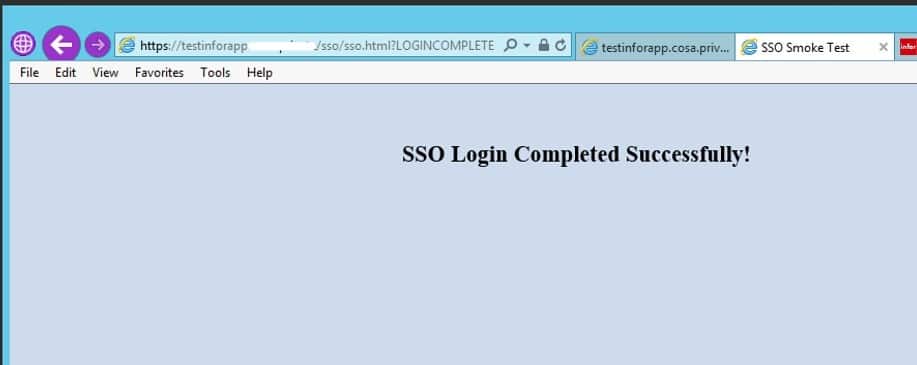
2 – Smoke Test
Make sure you can still log into Rich Client using your AD username & password
If you use IPA, it is also a good idea to run some IPA Smoke Tests to make sure that the authentication/communication between Landmark and Lawson is still functioning
This procedure is performed only on the IFS Web Utility, and is only required if you are using AD FS for authentication
Ensure that a certificate for the AD server is present in your IFS Server’s Trusted Root Certificate Store
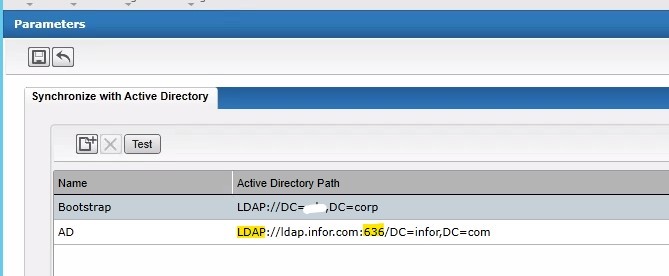
Update the AD Configuration in IFS
IFS > Configure > Parameters
Select your Active Directory configuration (not Bootstrap)
Update the URL with your LDAPS port, but the protocol should still be LDAP
Make sure you can still synchronize users in IFS
Conclusion
And now you are ready to enforce LDAPS connections! Be sure to also watch the webinar that we gave on this topic April 16, 2020. You can find it in the education section on our website.
As you might have heard, Microsoft is hardening their security with LDAP channeling and LDAP signing in an update coming sometime in the 2nd half of 2020. Any applications that rely on LDAP connections to Active Directory Domain Services (AD DS) or Active Directory Lightweight Directory Services (AD LDS) need to be converted to LDAPS. LDAPS is a secure connection protocol used between applications like Lawson and the Network Directory or Domain Controller. In this webinar, we will provide you step-by-step instructions for preparing your Lawson and Landmark environments to work with LDAP Signing.
Traditionally LBI is setup with Lawson Groups such as the LBIUser which by default, communicates to LBI which users should have access.
There is another way to assign rights in LBI aside from adding more groups to users. LBI has its own native “Report Security Group” system.
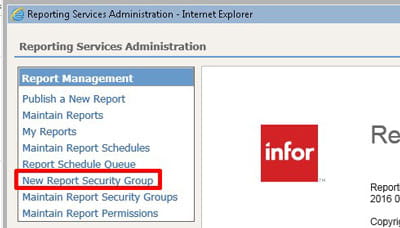
To access this system, login into LBI as your admin user and access Reporting Services Administration.
Under Report Management, select “New Report Security Group” to create a new security group
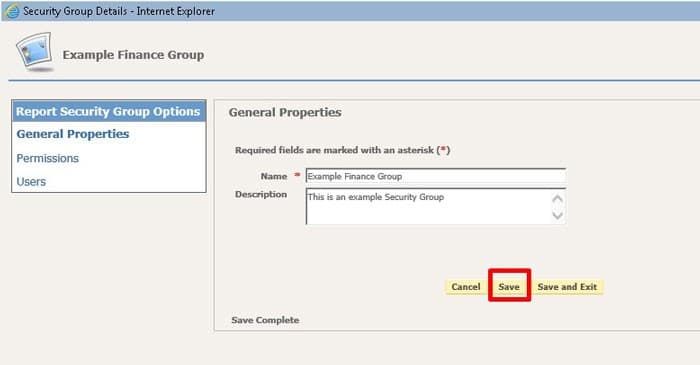
Enter the name of the group and description, click Save
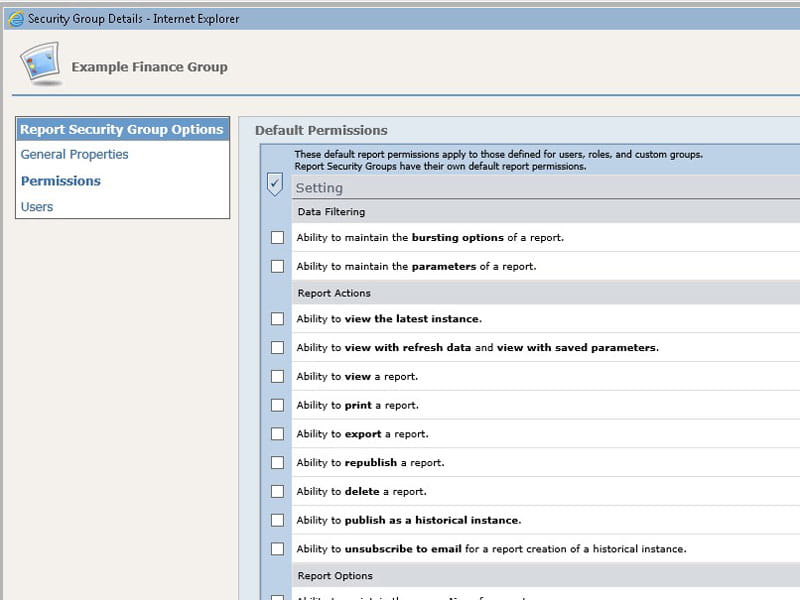
Now set the permissions similar to how you set permissions per report.
Go to Users and add the users you want to have access to this group, you can even set report overrides per user if needed
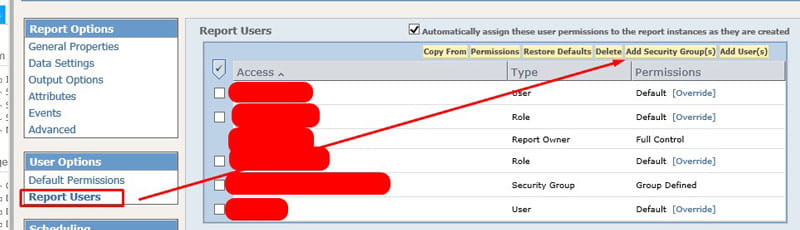
Now on an individual report, you can add the entire security group you just created to it:
You’ll still need to have Lawson groups to grant access to individual dashboards and modules but this helps add a new layer of security in an organized way.
https://www.nogalis.com/wp-content/uploads/2020/04/Utilizing-Lawson-Business-Intelligence-LBI-Security-Groups-3.jpg470470Angeli Mentahttps://www.nogalis.com/wp-content/uploads/2013/04/logo-with-slogan-good.pngAngeli Menta2020-04-16 08:37:282020-04-11 14:30:23Utilizing Lawson Business Intelligence (LBI) Security Groups
We are going to look at adding an AM template to an AP invoice align level and see how it flows over to the AM module.
https://www.nogalis.com/wp-content/uploads/2020/04/Adding-Assets-in-AP.jpg470470Angeli Mentahttps://www.nogalis.com/wp-content/uploads/2013/04/logo-with-slogan-good.pngAngeli Menta2020-04-08 07:55:222020-04-02 14:07:55Adding Assets in AP
Here is a simple was to Resolve the notification: “An error has occurred in the script on this page” for expression builder in Lawson Security Administrator (LSA).
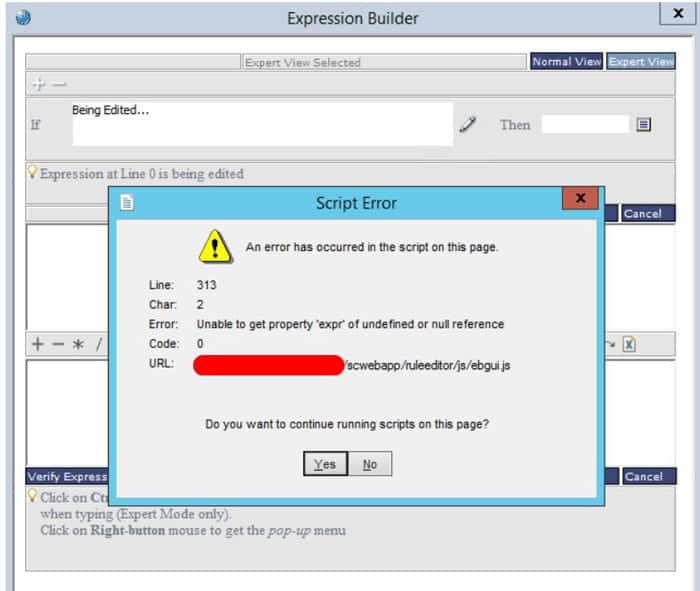
In LSA when trying to build a custom rule for a program you may get this error:
Trying to get passed it, it comes up again and doesn’t allow the user build rules for a file or token:
The resolution is pretty simple, go to your C:\Windows\SysWOW64 directory and run the following command:
regsvr32 msxml14.dll
You should get a pop-up confirming this. Login to LSA again and you should be good to go!
https://www.nogalis.com/wp-content/uploads/2020/03/How-to-Resolve-“An-error-has-occurred-in-the-script-on-this-page”-for-expression-builder-in-Lawson-Security-Administrator.jpg470470Angeli Mentahttps://www.nogalis.com/wp-content/uploads/2013/04/logo-with-slogan-good.pngAngeli Menta2020-04-06 07:22:422020-04-03 16:08:02How to Resolve “An error has occurred in the script on this page” for expression builder in Lawson Security Administrator
If you need to run a batch command in Lawson, first we need to open up Lawson interface desktop (LID).
Type the tokendef
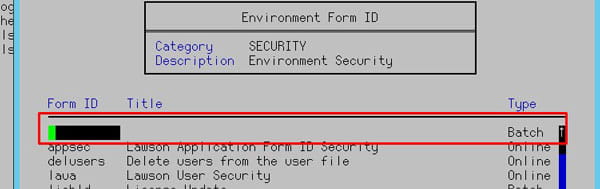
For this example we’ll select Environment Form IDs and then select SECURITY category.
Place your cursor at the top of the Environment Form ID list and press F8 to insert a command
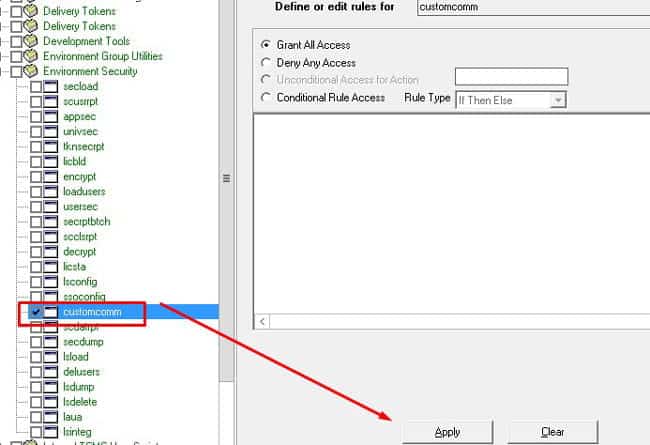
Type in the command you want here, ours is customcomm
In Lawson Security Administrator (LSA), go to ENV profile, open a security class you want to assign customcomm command to. Under Environment Security, you should see your new batch command, select and grant all access.
And we’re done!
https://www.nogalis.com/wp-content/uploads/2020/03/Adding-a-custom-batch-command-to-Lawson-Environment-Security.jpg470470Angeli Mentahttps://www.nogalis.com/wp-content/uploads/2013/04/logo-with-slogan-good.pngAngeli Menta2020-03-26 07:48:452020-03-24 11:52:38Adding a custom batch command to Lawson Environment Security
While this error itself may be obvious, you’ve already taken the steps to run the job under a different user with the same parameters and everything seems to be working. Sound familiar? Let’s dive deeper to see if this issue is related to yours.
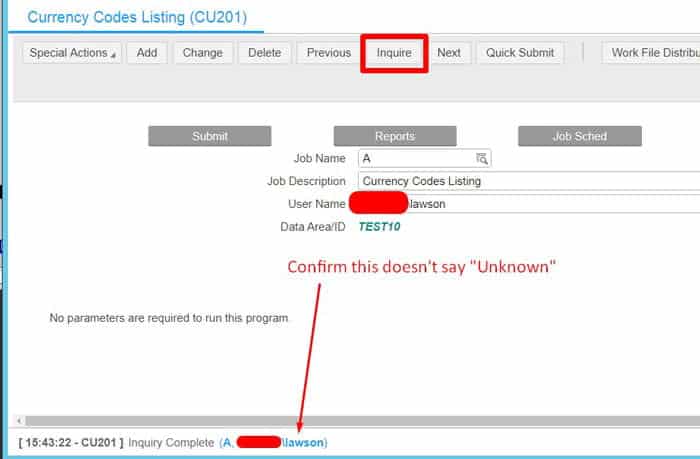
Go to the Lawson batch job form for the user that is having issues.
Inquire on the job and verify that you do NOT get an “Unknown” user
If you’re seeing an “Unknown” at the bottom of the browser bar, continue, else you likely do not have the same issue.
Open Lawson Interface Desktop (LID) and run command: listusermap -n
In LID, run command: listusermap -a
This should generate a new list of user identities again.
Clear your server cache and IOS cache, logout and back in and your issue be resolved.
https://www.nogalis.com/wp-content/uploads/2020/03/Resolving-job-error-“No-Data-in-Report-File-Check-Report-Parameters-for-Possible-Error-Message”.jpg470470Angeli Mentahttps://www.nogalis.com/wp-content/uploads/2013/04/logo-with-slogan-good.pngAngeli Menta2020-03-23 07:13:412020-03-20 17:26:27Resolving job error – “No Data in Report File – Check Report Parameters for Possible Error Message”