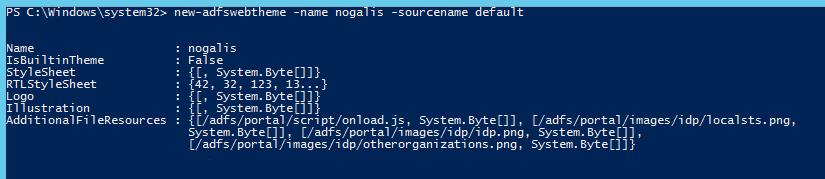
To update the database server that your Lawson instance is pointing to, you will need to modify the MICROSOFT (or ORACLE) files for each environment that you are updating.  These files can be found at %LAWDIR%/DATAAREA/MICROSOFT.  Simply change the server name for the DBSERVER value and bounce your Lawson services.

NOTE: This article assumes that your new database server utilizes the same credentials/authorization as the original database server.


To point your Landmark instance to a new database server, you need to update the db.cfg file for each environment.  These files can be found at %RUNDIR%/DATAAREA/db.cfg.  Make sure you update the data source for each data area, including GEN.  Bounce the Landmark services, or reboot your server, and you are done!


Here at Nogalis we perform managed service for several dozen enterprise customers. Most of our customers are either using Lawson V10 on premise or Infor CloudSuite products in the cloud. Our customers vary in their level of complexity but they almost all have several custom interfaces that support the operation of their businesses. Most of these interfaces are built with IPA (Infor Process Automation) or with ION which are both Infor supported products. Here are some examples just to name a few:

  • Positive pay interfaces to banks
  • Invoice import interface
  • Vendor creation interface
  • Automated user provisioning
  • Employee benefits exports and imports
  • COBRA interface
  • Batch job automation
  • Invoice or Purchase Order Approval interfaces
  • Journal entry imports

And many more

Many of these interfaces were designed and developed years ago and have been modified several times since. Unfortunately, the same cannot be said about the documentation that was once made for them if any. In an upcoming webinar and subsequent article, I plan to discuss how to develop accurate, useful, and easy to maintain documentation. But in this article, I want to focus on the reasons why we need these documents because without knowing why we do something, we’re not likely to do it right. The reasons below serve as guidelines for our documentation:

Reason 1 – Supporting the interfaces. This is the primary reason for creating good documentation. The goal of the any documentation should be that anyone can read it from start to finish and be able to support the existing process when it breaks. Therefore, one of the first things we do for our new managed service customers is to create detailed documentation of all their interfaces on our DOCR documentation portal and give them access to it. You can see some examples here. What’s nice about storing these documents on a web portal is that there is a central place for keeping them updated that everyone can contribute to. For support reasons, we make sure that we have a troubleshooting and a recovery section in each of our interface documents.

Reason 2 – Updates and enhancements. We’re routinely asked to update and enhance existing interfaces. While we can dig through the entire code of the interface to find out what every piece does, it is always helpful if some documentation exists that has an overview of the different components of the interface.

Reason 3 – Change Control. As we make changes to interfaces over the years, it is important to document these changes for change control purposes. Having a web-based documentation portal makes it easy to do this as it is the only version of the document that exists, and it is always updated with the latest changes.

Reason 4 – Application upgrades. As we upgrade our large enterprise applications, we always must study the impact of the upgrade on any custom interfaces that we have. The only way to do this quickly is to review the documents and specifically focus on any sections focusing on dependencies, and general data flow. Having proper documentation during an upgrade process can make the difference between a 1 month upgrade and a 6 month upgrade.

Reason 5 – Training and new hires. We pride ourselves in our one-to-one client to resource ratio in our managed service group. That means that for every new managed service customer, we add at least one new member to our team. This new team member goes through a rigorous training that includes reviewing all existing client documentation. This is an indispensable tool for our team as well as any client newhires.

If you need help creating your interface documentation, or to subscribe to our DOCR documentation portal, please contact us here.

Whether you are refreshing your test LBI environment or moving all your data to a new database server, you may eventually need to migrate your report data for LBI. This is a relatively simple process, provided the LBI instances using the data are the exact same version and service pack level.

First, back up your LBI databases on the source server and restore to the destination server (LawsonFS, LawsonRS, LawsonSN).

If you are migrating data for one LBI instance, you just need to point your WebSphere data sources to the destination server.

If you are migrating data for a new LBI instance, or for your test environment, you’ll need to update all the services and references to the old LBI instance.  In the LawsonFS database, ENPENTRYATTR table, you’ll need to search the ATTRSTRINGVALUE column for your old server name, and replace it with the new server name.  For example,

UPDATE ENPENTRYATTR

SET ATTRSTRINGVALUE = REPLACE(ATTRSTRINGVALUE, ‘source-server’, ‘destination-server’)

WHERE ATTRSTRINGVALUE LIKE ‘%source-server%’


After you update those strings, you will need to redo your EFS and ERS install validators to set the correct URL.

  • http(s)://lbiserver.comany.com:port/efs/installvalidator.jsp
  • http(s)://lbiserver.comany.com:port/ers/installvalidator.jsp
  • http(s)://lbiserver.comany.com:port/lsn/admin/installvalidator.jsp

Next, log into LBI and go to Tools > Services.  Click on every service definition to look for the source server name, and update with the destination server name.

Make sure your data sources are pointing to the proper ODBC DSNs, and/or add new ODBC connections.  Test and verify all your reports.

If you’re reading this, you must have already become curious about serverless computing or perhaps you just read our other article on the topic. There is no doubt that the future of computing will not have any traditional servers in it. In fact, I would venture to guess that by 2025, nearly every new development project will be a serverless project. This is not very hard to believe given that we at Nogalis have been developing all our enterprise applications for the past year using this paradigm and have yet to come up with a real reason to spin up a server.

There are a few things you need to understand about “Serverless” before you can start your project.

  1. Firstly, your current server-bound applications cannot run serverless without going back to the drawing board. In an ideal Serverless application, each request needs to stand on its own. Each request needs to process within a single function, verify itself and its caller’s authentication and permissions, run to completion, and set the states as needed. Your current application doesn’t do that. Your server is likely holding on to user sessions that have been authenticated and running so that it can handle the user’s next request. Without getting any more technical, the important things to understand is a “Serverless” application has to be designed and developed that way, it cannot be ported over magically. At least not today in 2019.
  2. Most, if not all enterprise applications deal with a database. AWS has made some great strides in the area of “Serverless” databases and at the current time (2019) offers two database options that are serverless:
    • Amazon DynamoDB – Amazon’s own NoSQL database service
    • Amazon Aurora Serverless – an on-demand, auto-scaling configuration for Amazon Aurora (MySQL-compatible edition), where the database will automatically start up, shut down, and scale capacity up or down based on your application’s needs.

It is obvious that if Microsoft, Oracle, and IBM want to remain competitive in the DB space, they will also have to offer Serverless versions of their database products or go the way of the mainframe. In the meantime, you can build a serverless application, that connects to a server-bound database in order to store its data. We won’t judge you.

  1. In a serverless environment, you don’t have any local storage. Because you don’t have a, ummm, server. So, you will need to figure out your storage as a part of your design. No more writing log file to d:\temp. This is one of the biggest reasons your current server-bound application can’t just go without a server. Luckily, AWS offers several API-enabled storage solutions to deal with this limitation. Our favorite is still S3 because of its ubiquitous edge availability, it’s incredible speed, it’s flexible use cases, and its many other advanced features.
  2. Last on my list is the method for accessing your compute logic. For this AWS provides their API Gateway which can trigger any of your functions with ease.

Of course, the items above are not the entire story. For instance, AWS SNS is a fully managed messaging service that you can use for messaging. Cloudwatch will help you with event monitoring and debugging. A whole host of applications exist that can help with nearly everything else. In the past two years of developing serverless applications, we have yet to have a need that we couldn’t eventually resolve with AWS available services. I say eventually because our developer brains were accustomed to think of every problem in a very server-centric way. Once you stop relying on the server to solve all your development challenges, you’ll think of some innovative ways to develop your applications that will surprise you.

If you’re considering developing a serverless enterprise application, we’d love to help. Please use the contact us page to make an appointment with someone on our team to discuss your serverless project.

Until recent years, we treated our servers like pets. We gave them names and assigned a high value to their health and uptime. If a server went down, we did everything in our power to get it back up and running. With the advent of virtualization, the term server became more synonymous with VM (Virtual Machine) and the fact that it was running didn’t really have as much significance simply because we could spin up many more like it within minutes. But that was still a problem. We had to spin up many more just like it. We had gone from treating servers like pets, to treating them more like cattle. It appears the dream of virtualization was realized as we didn’t need to worry about one specific server anymore. If web-007 failed, web-001 through web-006 were still around to handle the traffic and no one would even notice the difference while a new instance was generated. But even in this new virtual reality, the virtual environment (our cattle) had to be up and running all the time, feeding on energy and they needed attention.

This was a problem that didn’t seem to have a solution. It seemed that if you needed to compute a bit of logic, you would have to pass that request to a service that could process it for you and give you a result. So, the cattle were as efficient as we could get for a long while. But realistically, each bit of computing request is just a tiny little request. Surely, we don’t need an entire virtual farm always on standby to fulfill requests that are not even being called on all the time. What if we moved from the cattle model to the bacteria model? Imagine an infinite ocean of tiny little computing units (our bacteria) that would instantly rush to our call whenever we needed them. Now imagine if that ocean was shared by all our applications.

This is the serverless dream. In the cloud ecosystem, we call these container services and major cloud providers like Microsoft Azure and Amazon Web Services offer these container services in an all you can eat ocean of compute that you can tap into whenever and however much you desire. Imagine never having to scale your server infrastructure. Imagine only getting charged for the infinitesimally small amounts of time that the CPU is processing your request. That is what services like AWS Lambda provide. AWS Lambda lets you run code without provisioning or managing servers. You pay only for the compute time you consume – there is no charge when your code is not running. You simply write all the logic of your code within a Lambda function, link the function to an application gateway and you’re ready to invoke your logic from anywhere, on any device, at any time, and as many times as you like. It is easy to see that with this new model of computing, your data center will soon become a thing of the past, and with it the skillset you have developed around the data center model.

So, what will it take to go fully serverless? Can you run your applications on this new computing platform? How do you develop applications in a way that can take advantage of these new technologies? Subscribe to our newsletter to be notified of our upcoming articles that will address all these questions. If you have a serverless development project that you would like to talk to us about, you can contact us directly here. Nogalis has been developing serverless applications using AWS Lambda since 2017 and we’d love to discuss your upcoming projects.

You might come across the need to update a service or identity configuration in ssoconfig (LSF), especially if you have implemented AD FS and need to update your usernames or service URLs. A quick way to update a ssoconfig service is to load an XML file with the updates. Create and save your XML file, set your environment variables on LSF, then run the command ssoconfig -l <password> <filepath>

Here is the file format for a service and an identity (make sure OVERRIDE is set to true if you are doing an update):


<?xml version=”1.0″ encoding=”ISO-8859-1″?>

<BATCH_LOAD FORMAT=”” OVERRIDE=”true”>

  <SERVICE>

<HasCredential>TRUE</HasCredential>

<LoginProcedure>Form based</LoginProcedure>

<ID>DSSOIBITEST</ID>

<SvcEntryAttrList>user,password</SvcEntryAttrList>

<LOGINSCHEME NAME=”Form”>

<PROTOASSERT>Use HTTPS always</PROTOASSERT>

<HTTPURL>https://server.company.com:80/sso/SSOServlet</HTTPURL>

<HTTPSURL>https://server.company.com:443/sso/SSOServlet</HTTPSURL>

<PRIMARYTARGETLOOKUP>Verify passwords in Lawson Security</PRIMARYTARGETLOOKUP>

<LOGIN_RDN/>

<NAMING_ATTR>cn</NAMING_ATTR>

<USERNAMEFIELD>_ssoUser</USERNAMEFIELD>

<PASSWDFIELD>_ssoPass</PASSWDFIELD>

<SERVICEURL>https://server.company.com:443/sso/SSOServlet</SERVICEURL>

<LOGIN_SUBMIT_METHOD>POST</LOGIN_SUBMIT_METHOD>

</LOGINSCHEME>

<IdentityAttrList>user</IdentityAttrList>

<CredentialAttrList>PASSWORD</CredentialAttrList>

     </SERVICE>

</BATCH_LOAD>


<?xml version=”1.0″ encoding=”ISO-8859-1″ standalone=”no”?>

<BATCH_LOAD FORMAT=”Opaque” OVERRIDE=”TRUE”>

<IDENTITY SERVICENAME=”SSOP” >

<RDID>lawson</RDID>

<USER><![CDATA[[email protected]]]></USER>

</IDENTITY>

</BATCH_LOAD>


To convert LBI to use https, the first step is to make sure that you have valid PKCS 12 certificates installed in the Personal and Trusted Root stores on your LBI server. Export your certificate (or have your system admin do it for you) with the public key and private key, and with the full certificate chain.  During the export, provide a password for the certs.

In WebSphere on your LBI server, go to Security > SSL certificate and key management.  Select Key stores and certificates > NodeDefaultKeyStore > Personal certificates. Replace the default certificate with the cert that you just exported. Do the same for the CellDefaultKeyStore (if applicable). Next, under Key stores and certificates again, select the KeyStore and TrustStore, and select “Exchange Signers…”

Add your new certificate from the KeyStore to the TrustStore and Apply. Save the changes. No need to restart your application server yet, we will do that in a bit.

Make sure that your Virtual Hosts contain an alias for the secure port you plan to use. Note that this port must be the WC_defaulthost_secure port under Ports on your Application Server.

In LSF, update your DSP service for LBI to use the new service URL. The service should be set to “Use HTTPS always” and the new service URL should be “https://lbiserver.company.com:port/sso/SSOServlet.

Restart your LSF application server and your LBI application server.

Open your LBI install validator with https://lbiserver.company.com:secureport/efs/InstallValidator and make sure the system URL is set to the new secure URL. Submit the new URL. If the certificates are not valid, you will receive an error message indicating as such. Otherwise, there should be no failed tests.

As you might have heard, we’ve been working on a fully cloud-based, vendor self service solution for about a year now. We have worked with several customers to create a solution that is simple, intuitive, and brings instant value to any organization dealing with vendors and suppliers. Join us on Thursday June 6th (9am PST) as we do a walk-thru and a public Q&A. The webinar will feature the following modules and functionality:

  • Vendor OnBoarding
  • Vendor Check Requests and Invoice Submissions
  • Purchase Requests
  • Routing, Approvals, Document Management, Audit, Integration, and much more

When you configure LSF for ADFS, you will need to make some changes to your LBI configuration so that users will be able to access LBI with the userPrincipalName ([email protected]).

The first thing you need to do is ensure that you have a user in Lawson security where RMID = SSOP = UPN (userPrincipalName).  The RM User that is used to search LSF for LBI users must have an account where RMID and SSOP match.  It is recommended that you have a new AD user created for this purpose (such as lbirmadmin).

Add the new user to Lawson, ensuring that their ID and SSOP values both use UPN.  ([email protected])  Also make sure the new user is in the appropriate LBI groups for LBI access.

The next change will take place in the sysconfig.xml file located in <LBI install directory>/FrameworkServices/conf.  The ssoRMUserid should be the UPN of your LBI user mentioned above.  After you make these changes, restart the application server, clear the IOS cache in Lawson, and try logging into LBI.