You want to work with an IT partner that has functional knowledge in addition to the technological ability to extract and re-map the data. This allows a true partnership that looks at the process from a high level and keeps an eye on the details at the same time.
You need to look for a partner that has experience extracting data from Lawson and mapping to the format needed to upload set up and transactional data to any system and taking extracted data from another system and formatting it into what Lawson needs and uploading the data. A partner who uses a repeatable process that allows for tweaking the process if needed through testing cycles and then having the final version ready when you are ready to go-live.
When considering a divestiture there are many considerations. Some of these are:
How much history needs to remain on the current books?
How much history needs to be extracted for the divested company?
What happens to any un-paid vendor invoices? Will they remain on the current company or move to the divested company?
What kind of training will be needed for the divested or remaining users?
What interfaces need to be addressed? Are there any that need to be moved to the divested company or more importantly changed on the current company to ignore the divested company’s data?
Make sure to start with a BRD – Business Requirement Document – so you have a road map of what is expected throughout the process. This helps you, the divested parties and your partner know what is expected from all parties.
With the right partner, you can have a smooth and successful transition.
Your IT department will be busy during a divestiture.
The obvious part your IT department will play is data extraction for the data that needs to moved (or copied) from the current company to the divested company. All of your interfaces need to be reviewed to determine which of those need to be turned off or adjusted to prevent data from the divested company coming into your system after the divestiture is complete.
When considering a divestiture there are many considerations. Some of these are:
How much history needs to remain on the current books?
How much history needs to be extracted for the divested company?
Coordination between IT departments (current company, divested organization) on current interfaces and how they will be handled in the divested organization.
Make sure to start with a BRD – Business Requirement Document – so you have a road map of what is expected throughout the process. This helps you, the divested parties and your partner know what is expected from all parties.
Sometime you may have a need to update your LDAP bind connection, such as when the domain controller you are bound to is decommissioned.
To update the LDAP bind connection,
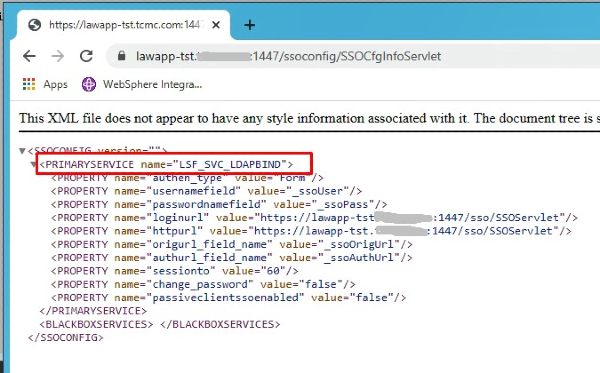
First figure out which service is using ldap bind. To do that, go to http(s)://<server>:<port>/ssoconfig/SSOCfgInfoServlet. Make a note of the service name displayed on the page.
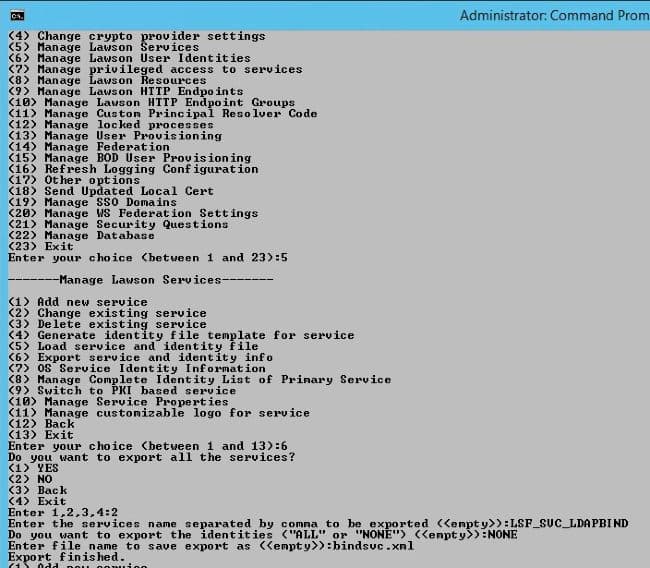
Next, log into ssoconfig and export that service:
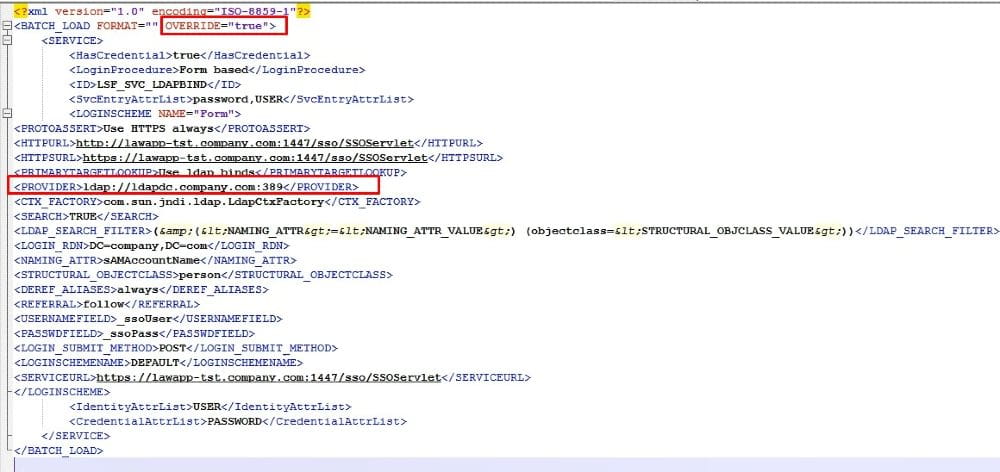
Now, open the file you just exported. Update the OVERRIDE attribute to “true”. Update the “PROVIDER” element to the new server and port.
Next, upload your updated file into ssoconfig. The syntax is ssoconfig -l <password> <full file path>
For example:
Ssoconfig data is stored in the security cache, so you will need to recycle your system for this change to take effect.
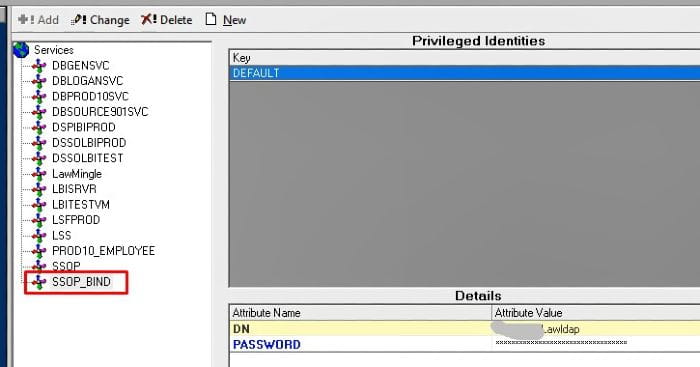
NOTE: If you need to change the credentials for the domain controller, this will be an extra process. You will need to update the service associated with your LDAP bind. This is most likely your SSOP_BIND service. You can look under privileged identities in Lawson Security, check for a “DEFAULT” key associated with your ldap bind user. That is your LDAP bind service.
To update the credentials for this service, log into ssoconfig and select Manage privileged access to services > Change existing identity. Enter the service that you noted above. Enter the correct user DN. Enter the password.
Recycle Lawson.
If you find duplicate items in your item master and want to reduce clutter, here are some tips:
- Items can have multiple ways of being identified. Many items are manufactured by different companies and they really are the same inventory item as they are interchangeable in your warehouse.
- Use the main manufacturer information on your item master – or the manufacturer information that your main supplier uses for the item.
- If different vendors provide different manufacturers items for the same item, then on PO13- Vendor Item, indicate the vendor and their item number and their manufacturer information there. This information will default onto a PO when ordering from one vendor vs. a different vendor. This allows you to have a single item that could be manufactured or supplied by multiple vendors and manufacturers.
- If there are multiple manufacturers or vendors for the item, then having a way to compare those is also important. Lawson does provide the ability to store manufacturer information in multiple ways – on the item master, on the item location record if a particular item for a location was being purchased from a different Vendor , and on the Vendor Item record. That means there are potentially multiple ways to store and find the manufacturer information for a particular item.
- POs are another place where manufacturer information for an item is stored so even if you are not storing the manufacturer information on the item master, you might still be able to create a cross reference by looking at your PO line data as well.
- Once all the options for manufacturer information are exhausted, then the remaining items will need to be matched item by item by description. This can be very time consuming especially since Lawson has a small description field which often requires considerable abbreviation of words in the description.
- Some additional considerations are to use the any of the other ways items might be classified This includes: generic name, Inventory classes, GL Categories, commodity codes and possibly SKUs if any of these are being stored.
Many people are moving from one enterprise resource planning (ERP) platform to another. There are many pieces to an Open PO that need to be considered when converting to a new ERP.
- How much history do you need to bring over to your new system? How often do you clean up your open POs in your current system? Do you need all of your open POs or only certain ones – for example, only those for active vendors?
- Cleaning up your old POs – closing out old POs that probably will never be finished at this point is a great idea before starting the conversion process.
- Locations – how will you deal with locations in your current ERP that will not be in your new ERP? Is there a default location that can be used to process the conversion? A memo or user field can be used to store the original information.
- What about inactive requesters – how will you address these? Providing a default or generic requester when the old ones won’t be in the new system is a good way to handle this. A memo or user field can be used to store the original information.
- Vendors – what about open POs for vendors who are inactive in your current system. Are you going to be converting those? The vendor will need to be added to your new system if the answer is yes.
- Make sure to have the most current chart of accounts and cost center mapping.
Looking for reduction of your item master by identifying duplicate items? Here are some tips to consider when consolidating two item masters.
- Different ERP systems can have multiple ways of identifying an item. Many items are manufactured by different companies and they really are the same inventory item as they are interchangeable in your warehouse.
- Use the main manufacturer information on your item master – or the manufacturer information that your main supplier uses for the item.
- If different vendors provide different manufacturers items for the same item, then using a vendor item cross reference can assist with keeping track of that. Lawson does that on PO13.
- If there are multiple manufacturers or vendors for the item, then having a way to compare those is also important. Lawson does provide the ability to store manufacturer information in multiple ways – on the item master, on the item location record if a particular item for a location was being purchased from a different Vendor , and on the Vendor Item record. That means there are potentially multiple ways to store and find the manufacturer information for a particular item.
- POs are another place where manufacturer information for an item is stored so even if you are not storing the manufacturer information on the item master, you might still be able to create a cross reference by looking at your PO line data as well.
- Once all the options for manufacturer information are exhausted, then the remaining items will need to be matched item by item by description. This can be very time consuming especially since Lawson has a small description field which often requires considerable abbreviation of words in the description.
- Some additional considerations are to use the any of the other ways items might be classified This includes: generic name, Inventory classes, GL Categories, commodity codes and possibly SKUs if any of these are being stored.


