To clear an existing sync lock in order to rerun the sync from the beginning again
From ssoconfig -c:
Login to the Infor Security Services web page
On the menu bar navigate to Federation > Manage Locked Process
If there is a process listed, make a note of the process that is locked
From the command line, run the ssoconfig utility. Type ssoconfig -c
At the prompt, enter the ssoconfig password
Select Manage Locked Processes
Select the number of the process that needs to be unlocked
Once it has been cleared, a message will appear that the process has been cancelled
Select the number that corresponds to Exit to return to the ssoconfig menu
Select EXIT at the ssoconfig utility
From the ISS web page:
Login to the Infor Security Services web page
On the menu bar navigate to Federation > Manage Locked Process
If there is a process listed, kindly check the box and hit the “unlock” button (Note: There may be more than one locked process, but you only need one to unlock, and all will be unlocked).
These 5 tips could make applying patches that much less stressful and are also good practice in general.
Tip 1: Check existing patch logs to see if a patch has already been applied previously and current versioning. This is good to check after a patch has been applied as well.
These logs can be found and generated here in LID:
perl %GENDIR%\bin\patches_installed_report <productline>
perl %GENDIR%\bin\source_versions_report <productline>
Tip 2: Restart the LSF server (or services) to ensure no processes are being held up and when it boots up, turn off Websphere LSF Appserver service before applying a patch to ensure users cannot log on, especially if patch needs to be applied during or close to work hours.
Tip 3: Run dbdef command to make sure there is a connection to the database before patching
Tip 4: When activating or staging multiple patches, run this command to speed up the post compile process:
qcontrol -jlocal,4 – This will set the servers cores to 4 when processing form compiles. Set it back to 2 when done. You can also check the status of the compiled jobs with command: qstatus | head -5
Tip 5: If a Plus dictionary is created after patching, its typically good practice to compile the entire product line with the command: cobcmp (be aware this can take up to 20-30 minutes to complete, tip 4 helps with this). This ensures that all programs are functioning correctly before passed to testers.
Bonus Tip: Verify security is on before sent to the testers! Hope these were helpful.
If you require assistance with applying patches for your v10 system, it is common for organizations to engage Lawson consultant teams for managed services, which are available at a fixed monthly rate. These consultant teams possess significant knowledge and expertise and are suitable for larger organizations. Additionally, smaller organizations that do not require a full-time Lawson employee on-site may also find this service advantageous. Nogalis offers this service, and you can contact us through our contact page for further details.
After an install or an update, you may experience an error “actor_does_not_support_run_as” on certain node types.
Caused by: com.lawson.security.authen.SecurityAuthenException: com.lawson.security.authen.LawsonUserContextImpl.security.authen.actor_does_not_support_run_as
at com.lawson.security.authen.LawsonUserContextImpl.setRunAsUserOnContext(LawsonUserContextImpl.java:1498)
at com.lawson.security.authen.LawsonUserContextImpl.setRunAsUserOnContext(LawsonUserContextImpl.java:1461)
at com.lawson.security.authen.LawsonUserContextImpl.setRunAsUserOnContext(LawsonUserContextImpl.java:1452)
at com.lawson.security.authen.LawsonUserContextImpl.setRunAsUserOnDuplicateContext(LawsonUserContextImpl.java:1593)
at com.lawson.security.authen.DataCtxUserCtxWrapper.setRunAsUserOnDuplicateContext(DataCtxUserCtxWrapper .java:432)
… 15 more
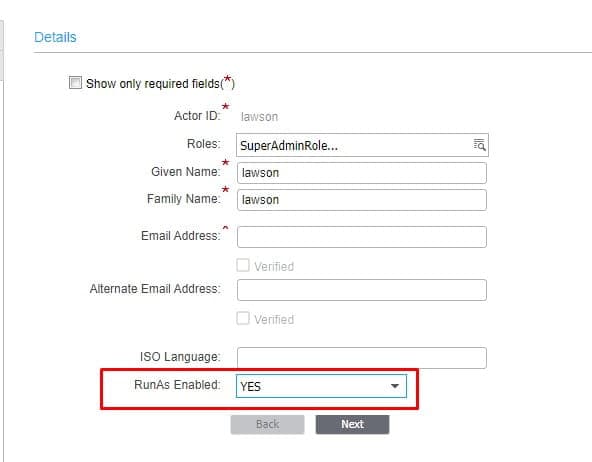
To mitigate this issue, log into ISS, and go to Manage Users. Search for the lawson user and click the Edit button. On the Basic tab, set “RunAs Enabled” to “YES” and click save. Wait for the configuration to take effect, or run a stoplaw/adminlaw/startlaw.
If you are not using ISS, the Landmark command to set the RunAs is:
secadm actor enablerunas lawson
After running this command, run the stoplaw/adminlaw/startlaw.
You will want to start by reviewing the security_provisioning.log(s) in your LAWDIR/system directory.
All transactions completed in ISS related to user maintenance, federation, and synchronization, are logged in the LAWDIR/system/security_provisioning.log(s).
Please note, the log may take a few minutes to complete after the sync completes in the browser. Once the logs have completed, best practice is to copy the log(s) to a new directory so that they are not overwritten while you are researching the sync errors.
Open the most recent provisioning log and go to the bottom of the log. If nothing has been done in ISS since the sync completed you should see a message similar to the one below followed by a list of records that failed:
Thu Apr 26 16:56:01.282 CDT 2018 – default-457261151: Sync Analysis for object type IDENTITY completed with status=true
Thu Apr 26 16:56:01.282 CDT 2018 – default-457261151: Sync Analysis successfully completed for object type IDENTITY
Thu Apr 26 16:58:52.073 CDT 2018 – 1360326122: Sync Execution successfully completed for Task ID[4,963] with failed transactions for Sync Records:
The list of records that failed is limited to one section of the sync. You will see a list of either roles, actors, services, domains, endpoints endpoint groups or identities, depending on which section of the sync had failed records. This is because once the sync completes the analysis or execution of the section with the failed records the sync process will not continue. You must address the failed records to continue the sync.
Alternately you can search the log for the word “completed” to find the most recent section of the sync process that completed. There will be a completed message for each section of the sync.
Examples of completed messages without failed records:
Thu Jan 28 10:50:29.536 GMT-06:00 2021 – default-1845137754 – L(4) : Sync Execution task for [ROLE] with Task ID [1207] started.
Thu Jan 28 10:50:29.536 GMT-06:00 2021 – default-1504145202 – L(4) : Setting progress percentage [-1]
Thu Jan 28 10:50:29.537 GMT-06:00 2021 – default-1504145202 – L(4) : Success updating task [1207]
Thu Jan 28 10:50:29.537 GMT-06:00 2021 – default-1504145202 – L(4) : Starting Sync Execution using pagesize [500] and Nthread [5]
Thu Jan 28 10:50:29.551 GMT-06:00 2021 – default-1504145202 – L(4) : Retrieved 0 ROLE for execution
Thu Jan 28 10:50:29.551 GMT-06:00 2021 – default-1504145202 – L(4) : Sync Execution Successful for ROLE
Thu Jan 28 10:50:29.551 GMT-06:00 2021 – default-1504145202 – L(4) : SyncExecution execution time for [ROLE] took [0] seconds to complete
Thu Jan 28 10:55:33.485 GMT-06:00 2021 – default-863748063 – L(4) : Sync Execution task for [DOMAIN] with Task ID [1219] started.
Thu Jan 28 10:55:33.500 GMT-06:00 2021 – default-1293059945 – L(4) : Setting progress percentage [-1]
Thu Jan 28 10:55:33.500 GMT-06:00 2021 – default-1293059945 – L(4) : Success updating task [1219]
Thu Jan 28 10:55:33.502 GMT-06:00 2021 – default-1293059945 – L(4) : Starting Sync Execution using pagesize [500] and Nthread [5]
Thu Jan 28 10:55:33.506 GMT-06:00 2021 – default-1293059945 – L(4) : Retrieved 0 DOMAIN for execution
Thu Jan 28 10:55:33.506 GMT-06:00 2021 – default-1293059945 – L(4) : Sync Execution Successful for DOMAIN
Thu Jan 28 10:55:33.506 GMT-06:00 2021 – default-1293059945 – L(4) : SyncExecution execution time for [DOMAIN] took [0] seconds to complete
Examples of completed messages with failed records:
Thu Jan 4 07:19:55.755 EST 2018 – default- 2123289590: SyncAnalysis for ACTOR have 2 error records
Thu Jan 4 07:19:55.755 EST 2018 – default- 2123289590: Sync Analysis for object type ACTOR completed with status=true
Thu Jan 4 07:19:55.842 EST 2018 – 2123289590: Sync Analysis completed for object type ACTOR with failed Sync Records:
ACTOR=user1;
ACTOR=user2;
Tue Apr 19 10:18:33.128 CDT 2018 – default-1441714547: SyncAnalysis for ENDPOINT have 7 error records
Tue Apr 19 10:18:33.128 CDT 2018 – default-1441714547: Sync Analysis for object type ENDPOINT completed with status=true
Tue Apr 19 10:18:33.130 CDT 2018 – 1441714547: Sync Analysis completed for object type ENDPOINT with failed Sync Records:
HTTPPORT=82,SSODOMAIN=CSEMSS_EXTERNAL,FQDN=WFHPROD-LSF01.COM,HTTPSPORT=1448;
HTTPPORT=81,SSODOMAIN=CS_INTERNAL,FQDN=WFHPROD-LSF01.COM,HTTPSPORT=443;
HTTPPORT=81,SSODOMAIN=CS_INTERNAL,FQDN=WFHPROD-LM01.COM,HTTPSPORT=1443;
HTTPPORT=85,SSODOMAIN=TC_LDAP_BIN_EXT,FQDN=WFHPROD-LSF01.COM,HTTPSPORT=1447;
HTTPPORT=85,SSODOMAIN=TC_LDAP_BIN_EXT,FQDN=WFHPROD-LM01.COM,HTTPSPORT=1447;
HTTPPORT=9080,SSODOMAIN=CS_INTERNAL,FQDN=WFHPROD-MSCM01.COM,HTTPSPORT=8443;
HTTPPORT=21442,SSODOMAIN=CS_INTERNAL,FQDN=WFHPROD-IES01.COM,HTTPSPORT=9443;
Tue Apr 3 10:51:21.774 EDT 2018 – default-471380075: SyncAnalysis for IDENTITY have 4 error records
Tue Apr 3 10:51:21.774 EDT 2018 – default-471380075: Sync Analysis for object type IDENTITY completed with status=true
Tue Apr 3 10:51:21.774 EDT 2018 – 471380075: Sync Analysis completed for object type IDENTITY with failed Sync Records:
IDENTITY=USER:DOMAIN\user1,SERVICE=SSOP,ID=user1;
IDENTITY=USER:DOMAIN\user2,SERVICE=SSOP,ID=user2;
IDENTITY=USER:user1@domain.com,SERVICE=THICKCLIENTLDAPLS,ID=user1;
IDENTITY=USER:user2@domain.com,SERVICE=THICKCLIENTLDAPLS,ID=user2;
To find the exceptions for the failed records you will need to search within the log(s) each failed record. For each failed record you will search for the value from the list without the semicolon at the end of the line:
For failed record ACTOR=user1; you will would search for “ACTOR=user1”
For failed record HTTPPORT=82,SSODOMAIN=CSEMSS_EXTERNAL,FQDN=WFHPROD-LSF01.COM,HTTPSPORT=1448; you would search for “HTTPPORT=82,SSODOMAIN=CSEMSS_EXTERNAL,FQDN=WFHPROD-LSF01.COM,HTTPSPORT=1448”
For failed record IDENTITY=USER:DOMAIN\user1,SERVICE=SSOP,ID=user1; you would search for “IDENTITY=USER:DOMAIN\user1,SERVICE=SSOP,ID=user1”
Recently a user submitted an error that could be useful for anyone else who encounters it.
Problem
The user is reporting they are not seeing Expense Reports in Lawson XM. They are receiving emails.
Solution
While this could be an alerting problem, we have a quick fix for user error.
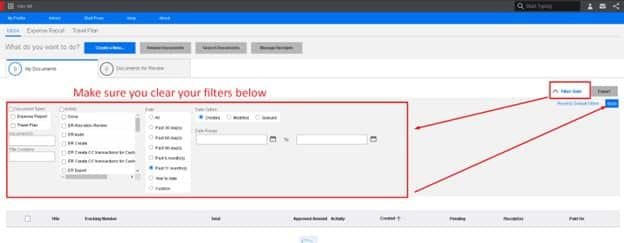
The user needs to log into Mingle. Once logged in and in XM, simply click on the filter option at the top right of the screen. Here, you must make sure you clear your filters as shown below:
Log back in and you should not have the missing error again.
As businesses grow and technology advances, it’s not uncommon for companies to outgrow their current enterprise resource planning (ERP) software. In some cases, this may mean moving from an on-premise solution, such as Lawson, to a cloud-based platform like Infor Cloudsuite. If you’re considering making the switch, here are some steps to keep in mind.
- Evaluate your current system: Before making any changes, it’s important to evaluate your current system to identify what’s working well and what needs improvement. Consider factors like system performance, ease of use, functionality, and cost. This will help you determine whether Infor Cloudsuite is the right choice for your organization and identify any specific features or functions you need to ensure a successful transition.
- Plan your migration: Once you’ve decided to move to Infor Cloudsuite, the next step is to plan your migration. This involves determining what data needs to be migrated, setting a timeline for the transition, and identifying any potential challenges or roadblocks. It’s also important to consider how the migration will impact your business operations and develop a plan to mitigate any disruptions.
- Prepare your data: Before migrating to Infor Cloudsuite, you’ll need to ensure that your data is ready for the transition. This may involve cleaning up data, consolidating data sources, and preparing data for the new platform. It’s important to work closely with your IT team to ensure that data is transferred accurately and securely.
- Prepare interfaces: Determine which interfaces, both internal and between 3rd party vendors, will need to be rewritten, and which ones can be archived. Work closely with IT to refactor or recreate the interfaces and prepare them for the new cloud environment.
- Train your staff: Moving to a new ERP platform can be a significant change for your organization, so it’s important to provide training and support to your staff. This may involve providing training on the new system, helping staff understand how to use new features, and ensuring that they have the resources they need to be successful.
- Go live: Once you’ve completed all of the necessary preparation and training, it’s time to go live with Infor Cloudsuite. This is a critical phase of the transition, as it’s important to ensure that the new system is fully operational and that any issues are quickly addressed. It’s also important to have a plan in place to handle any unforeseen issues or challenges that may arise during this phase.
- Monitor and optimize After the transition is complete, it’s important to continue monitoring the new system to ensure that it’s meeting your organization’s needs. This may involve tracking system performance, identifying areas for improvement, and making changes to optimize the system. By continually monitoring and optimizing the system, you can ensure that you’re getting the most out of Infor Cloudsuite and supporting your organization’s ongoing success.
In conclusion, moving from Lawson on-premise to Infor Cloudsuite can be a complex process, but by following these steps and working closely with your IT team and vendor, you can ensure a successful transition. By choosing a cloud-based ERP solution like Infor Cloudsuite, you can benefit from improved functionality, scalability, and cost-effectiveness, supporting your organization’s growth and success in the years to come.


