Lawson Portal 10.1 Series – Adding Main Content in Portal 10.1
We’ve covered three articles in the Lawson Portal 10.1 series: how to personalize the theme and portal elements of your Lawson Portal, as well as how to add personal bookmarks on the page. In the next part of the series, we will go over how to add main content.
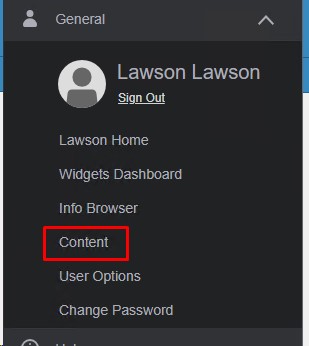
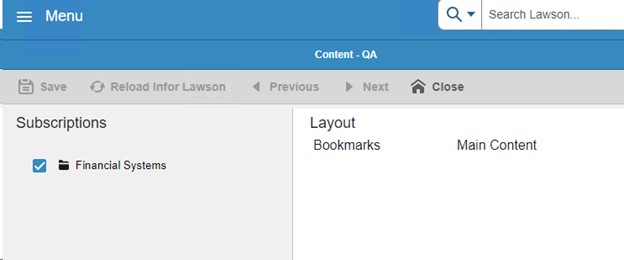
In Lawson Portal 10.1, adding content to your main screen is very similar to previous versions. First, open the left-hand menu and go to General > Content.
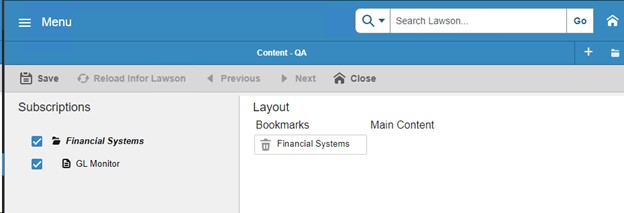
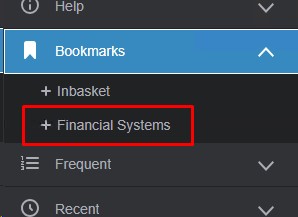
Expand the bookmark that has the you wish to add (on the left). Double-click the subordinate (under the bookmark) that you wish to see on the main content page. The item will be moved to the right side under Main Content after it is added. If you don’t see the bookmark you are looking for, check with your administrator to make sure you have access.
Before:
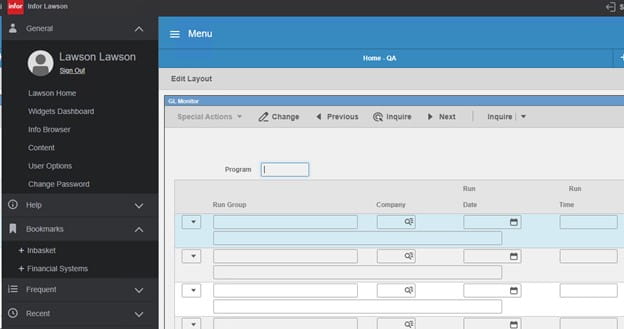
After:
Click Save and Reload Infor Lawson. Now your homepage will contain the content you selected.
Lawson Portal 10.1 Series – Adding Bookmarks in Portal 10.1
In the first two articles of the series we went over how to personalize the theme and portal elements of your Lawson Portal. The next article in the Lawson Portal 10.1 Series overview will cover how to add personal bookmarks on the page.
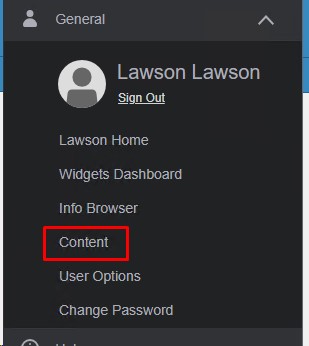
In Lawson Portal 10.1, adding bookmarks is very similar to previous versions. First, open the left-hand menu and go to General > Content.
Double-click from the available bookmarks that you wish to add (on the left). The Bookmark will be moved to the right side under bookmarks after it is added. If you don’t see the bookmark you are looking for, check with your administrator to make sure you have access.
Before:
After:
Click Save and Reload Infor Lawson
Issue: Users encounter the following error when executing a query or upload in Microsoft Office Add-ins (MOA):
FATAL ERROR: ITEM_SECURED
File FILERELFLD is secured.
Refer to the moa.log for any returned error details.
NOTE: CNDFLD could also be listed as a file/table in the error displayed above.
How can I address this message?
Resolution: This issue stems from a security (authorization) setup/configuration problem.
To resolve this, you need to determine where to add the security rule. The steps outlined below are tailored to implementing this change in the ADDINS security class provided by Infor Lawson by default. This ADDINS security class is linked to the LawsonQueryToolsRole security role. Typically, end users requiring access to MOA should have the LawsonQueryToolsRole assigned to them, as it’s a preconfigured deliverable granting all necessary access to items required for MOA usage. If you’re utilizing a different setup, adjust the steps accordingly by adding the rule to the appropriate security class instead of ADDINS. Ensure that the security class is assigned to a ROLE already assigned to the user.
- Log in to Lawson Security Administrator (LSA).
- Navigate to the “Profile Management” tab.
- Click on “Profiles.”
- Double-click on the “GEN” Profile ID.
- Double-click on the “ADDINS” security class name.
- Click the “Add Rule” button.
- Change the “Securable Types” to “Files.”
- Expand (Click on +) “CS.”
- Locate the table listed in the error under “CS” (e.g., FILERELFLD) and check the box next to it.
- Click “Apply.”
- Test with the user. Note that you might need to wait for your security “caching interval” to pass. This setting can be found in the LSA tool under Server Management > Server on the general tab and is typically set to 900 seconds (15 minutes) by default.
The option to “Create CSV File” in print manager in Portal or attempt to export a report to CSV using Lawson Addins, the CSV file is not generated and the following error message is displayed in Excel or the browser after it opens:
Error generating CSV report file. Check IOS logs for details.
ERROR [ key=ERROR_GENERATING_CSV level=1 ]
<![CDATA[ Error generating CSV report file. ]]>
<![CDATA[ Check IOS logs for details. ]]>
The ios.log shows the following type of detail:
2024-01-05 13:40:32,088 ERROR [WebContainer : 8] [user1 ] [REPORT ] [BldxffilesRunner] ********************** bldxffiles **********************
2024-01-05 13:40:32,088 ERROR [WebContainer : 8] [user1 ] [REPORT ] [BldxffilesRunner] Security Violation
/GENDIR/bin/rptgen: Error Encountered In Execution
2024-01-05 13:40:32,088 ERROR [WebContainer : 8] [user1 ] [REPORT ] [BldxffilesRunner] ********************************************************
2024-01-05 13:40:32,088 ERROR [WebContainer : 8] [user1 ] [REPORT ] [ReportEngine] IOException generated while streaming / LAWDIR/print/user1/ap201/1/AP201.csv/
2024-01-05 13:40:32,088 ERROR [WebContainer : 8] [user1 ] [REPORT ] [ReportEngine] File not found /LAWDIR/print/user1/ap201/1/AP201.csv
2024-01-05 13:40:32,089 ERROR [WebContainer : 8] [user1 ] [REPORT ] [Report] com.lawson.ios.core.Report.ReportException: ERROR_GENERATING_CSV
2024-01-05 13:40:32,096 INFO [WebContainer : 8] [ ] [ ] [IOSSecurityContext] Destroying security context for user1
Resolution:
To troubleshoot this issue, follow the steps below:
Check the LAWDIR/system/ios.logs for the actual error message and problem. When reviewing the IOS logs, start with a search for “ERROR_GENERATING_CSV” and then review the messages that occur before that.
For the error message used in the example above, make sure the user has been granted access to the “rptgen” token under the ENV profile in Lawson Security. The user should be assigned a batch role which grants access to ‘rptgen’.
- Log into the Lawson Security Administrator.
- Go to the ENV profile.
- Select your batch security class.
- Click Add Rule.
- Choose the box for development tools.
- Select Grant all access.
- Expand the development tools.
- Select rptgen – Grant all access.
- Apply the rule.
Lawson Portal 10.1 Series – Personalizing the Form Elements of Lawson Portal 10.1
In the first article of the series we went over how to personalize the theme of your Lawson Portal. The next article in the Lawson Portal 10.1 Series overview will cover how to personalize the form elements on the page.
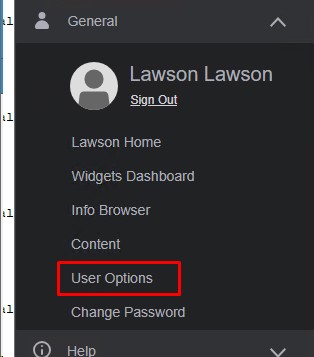
To update the form elements, such as label colors and sizes, of Lawson Portal 10.1, from the left-hand menu, go to General > User Options.
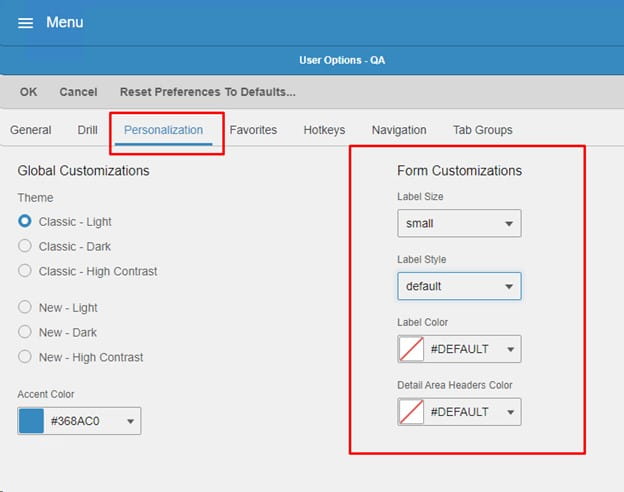
Next, click the Personalization Tab.
Under Form Customizations settings you have the options to select a label size, label style, label color, and detail area headers color. Feel free to customize to your likings or match your company’s colors.
Lawson Portal 10.1 Series – Personalizing the Theme of Lawson Portal 10.1
Welcome to the first article of the Lawson Portal 10.1 Series. Along with this one, future posts will cover other personalizations, how to set up your bookmarks, and adding main content to your Lawson Portal screens. Let’s get started with the first topic – personalizing the theme of your Lawson Portal 10.1.
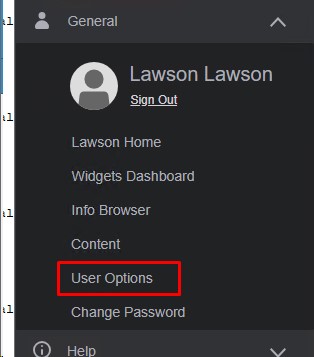
To change the theme (background/foreground colors) of Lawson Portal 10.1, from the left-hand menu, go to General > User Options.
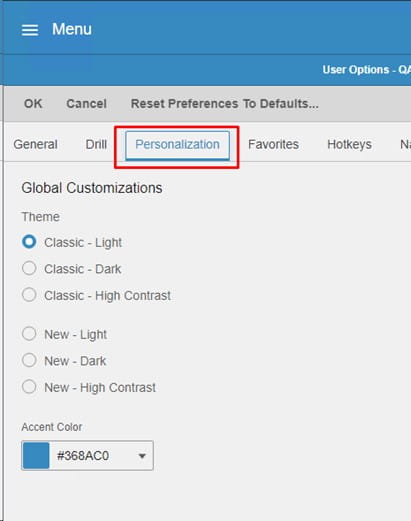
Next, click the Personalization Tab.
Under Global Customizations you have the options to select a new theme (light, dark or high contrast), and a different Accent Color if desired (usually to match your company’s colors).


