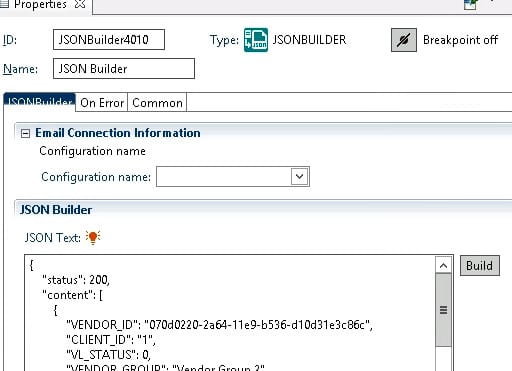
The JSON Builder node can be used to build a JSON object, which you can use later in your flow for reading or sending out to a server using a web call.
Under the input tab on the Properties, the input could be output from some other node, a variable, or a text string.
The output of a JSON builder can be used to send a JSON web call, or it can be read similarly to the JSON parser output.
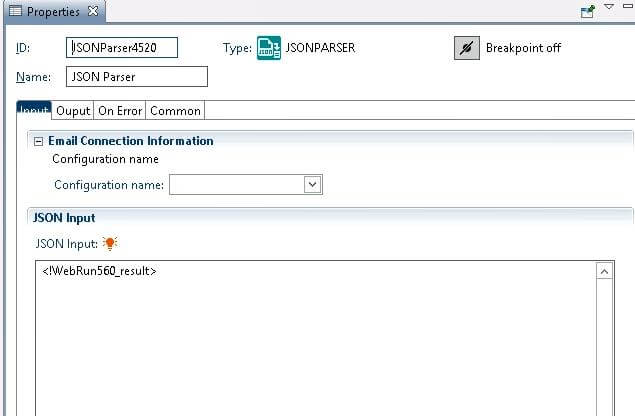
The JSON Parser node can be used to parse JSON data, either from a local file or from a response from a Web API. The steps are very similar to getting XML data from a web API.
Under the input tab on the Properties, the input could be output from some other node, such as a file access node or Web Run result.
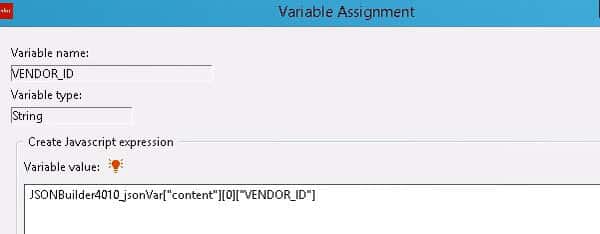
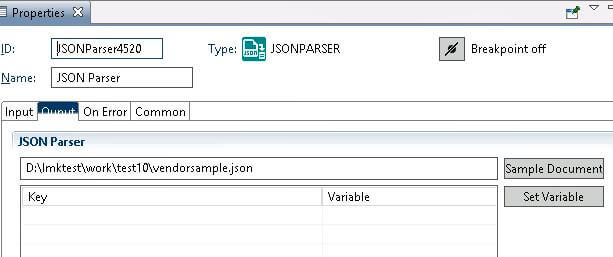
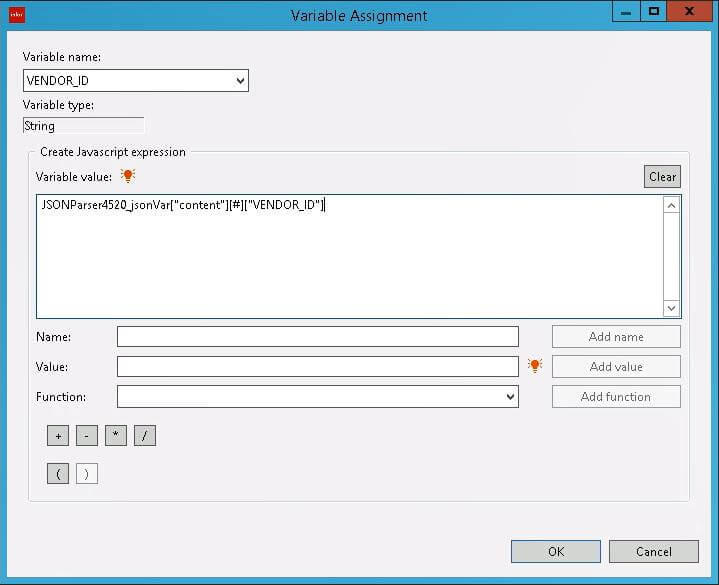
For the output, if you provide a sample file with a JSON response, that is an easy way to get the syntax for the variables coming across in the JSON response. You can click “Set Variable” to see the syntax, and you can select “Export Variables” to get a file with the syntax for all variables in the sample file.
Use this output syntax to set variable values to use later in your flow.
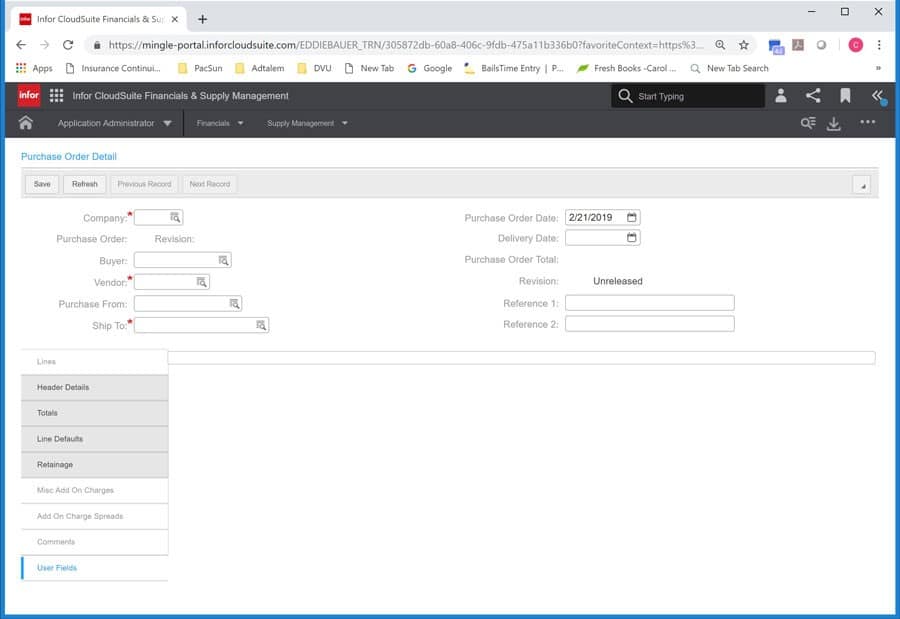
Some of them are still there in the Business Class (a file with functions built into it) none of them are on the forms.
Some forms do have tabs for user fields, there are no fields there and the fields need to be added using Configuration Console.
Attributes which have always been user fields on steroids, also go away in CSF. Using Configuration Console any kind of custom field can be added.
In conclusion, user fields are not gone, you can still have as many as you would like, they just need to be added to the forms and sometimes to the business class using Configuration Console. Keep in mind that the system updates every 3rd Saturday so it is best to add only those that you really need.
https://www.nogalis.com/wp-content/uploads/2019/03/What-happened-to-User-Fields-in-CSF.jpg447490Angeli Mentahttps://www.nogalis.com/wp-content/uploads/2013/04/logo-with-slogan-good.pngAngeli Menta2019-03-11 07:17:182019-04-24 09:57:35What happened to User Fields in CSF?
Many times, you will have a need to run environment utilities (such as importdb) using a system command node, or a batch job such as IMDBB. If you are getting security violations when you attempt to use these tools, you will need to elevate the Lawson Security privileges of the user running IPA. The reason for this is that the system user running the IPA service is who actually is running those system commands. Windows took away the ability to do a “run as”, so there is no way to bypass that user.
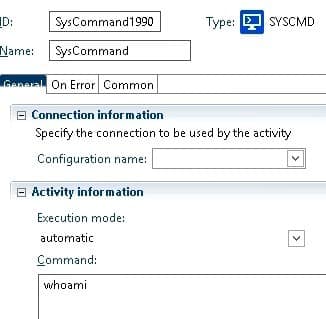
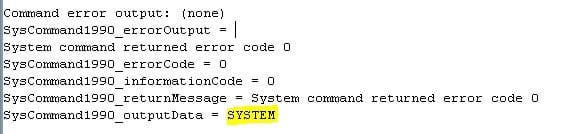
If you don’t know which user is running IPA, you can find out by executing a “whoami” command in a system command node on your IPA server.
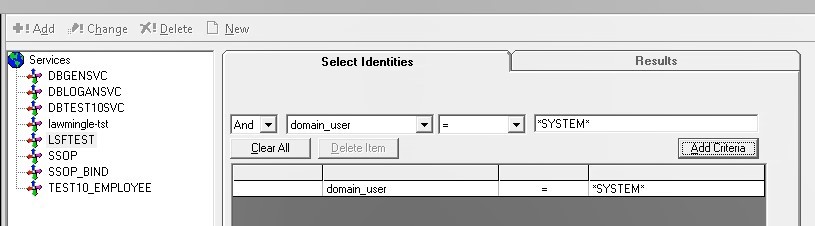
Next you need to find this user in Lawson Security so you can elevate his privileges. Open up Lawson Security and go to Manage Identities. Search for the service account that you discovered in your “whoami” command.
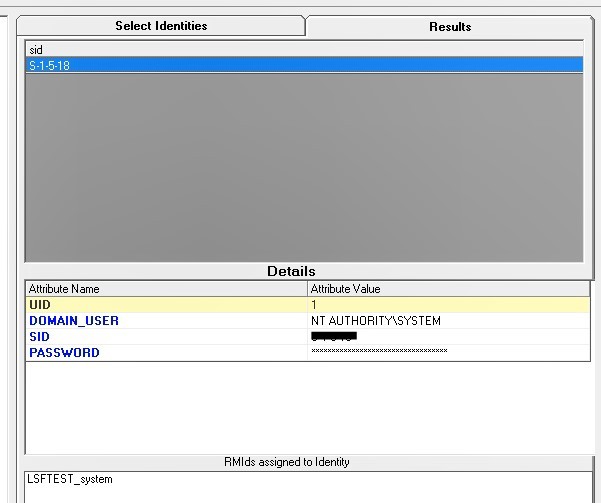
Make not of the RMID and use that to search for the user under User Management. Set that user’s “CheckLS” to “YES” and give him the roles required to allow access to the necessary environment utilities.
https://www.nogalis.com/wp-content/uploads/2019/02/Security-Violation-Using-Environment-Utilities-in-IPA.jpg450495Angeli Mentahttps://www.nogalis.com/wp-content/uploads/2013/04/logo-with-slogan-good.pngAngeli Menta2019-03-04 07:52:042019-02-28 10:32:09Security Violation – Using Environment Utilities in IPA
It is ridiculously difficult and ambiguous how you’re supposed to get the Oracle ODBC driver installed on your Windows machine. It’s certainly not a simple task. Well, since I figured it out today I thought I would document it.
First you need to download all three of these files from oracle
1) instantclient-basic-win-x86-64-11.1.0.7.0
2) instantclient-odbc-win-x86-64-11.1.0.7.0
3) instantclient-sdk-win-x86-64-11.1.0.7.0
Extract the contents of all the above into a single directory called D:\Oracle\Ora11\
That directory doesn’t exist and you’ll have to create it first.
Now with all the files copied in there, create the following windows environment variables:
1) OCI_LIB64 = C:\Oracle\Ora11
2) ORACLE_HOME = C:\Oracle\Ora11
3) TNS_ADMIN = C:\Oracle\Ora11
Also, add “C:\Oracle\Ora11” to your PATH variable.
At this point you MUST reboot. No other way around it. Simply restarting the explorer task won’t do.
After the reboot, create the following directory: C:\Oracle\Ora11\Network\Admin
Place your tnsnames.ora file inside this new directory.
Open a cmd prompt as administrator.
cd to the C:\Oracle\Ora11
On the command prompt type the following command:
odbc_install.exe
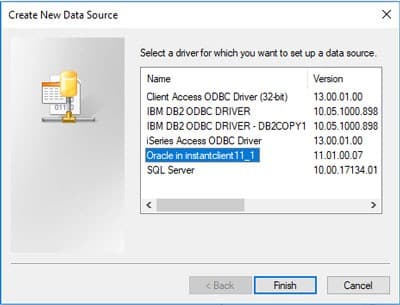
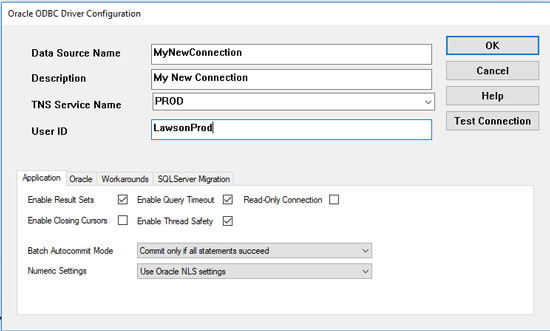
You should receive a message that says: “Oracle ODBC Driver is installed successfully.”
The new ODBC driver is only in the ODBC 64-bit data sources.
You can now add a new one like so:
Just remember that your tnsnames.ora file must contain the service you’re trying to connect to.
https://www.nogalis.com/wp-content/uploads/2019/02/How-to-install-Oracle-ODBC-client-for-windows.jpg445490Angeli Mentahttps://www.nogalis.com/wp-content/uploads/2013/04/logo-with-slogan-good.pngAngeli Menta2019-03-01 08:39:592019-02-28 10:40:16How to install Oracle ODBC client for windows
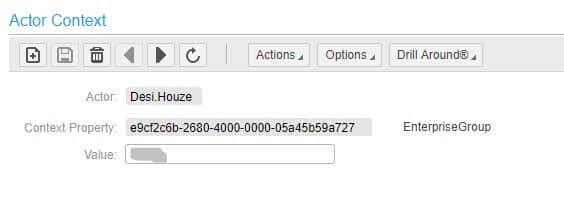
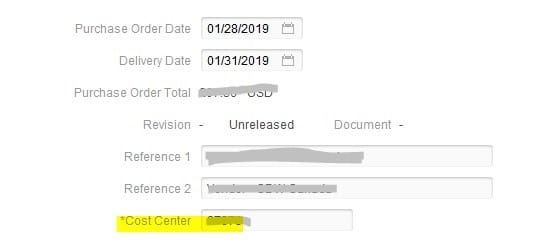
The other day, we configured the delivered IPA service PurchaseOrderApproval, which is supposed to be triggered by releasing a PO. We set up the purchasing companies to require approval, and we made sure the buyers used the company defaults. And still when we would release a PO, the status went to “Released. Not Issued.” instead of “Needs Approval”, and no work units were created.
After verifying all of the settings on the Service Definition and IPA process, we finally realized that the tester did not have any Context Properties attached to her Actor record. Context Properties are found under the Security menu when you log into CloudSuite Financials under the Administration Console role. To assign contexts to an actor, choose “Actor Context”. Search for your actor, and add the necessary context values to the actor. The value will be your company’s Finance Enterprise Group, a value provided to you by Infor.
On March 1, 2019, Infor will no longer support LS/STS authentication configuration for Lawson applications. The Infor recommended configuration will be to use Active Directory Federation Services (ADFS) for Single Sign-On (SSO) authentication. To learn more about ADFS, check out our other articles on the topic:
If your organization chooses not to move to ADFS at this time, you have two other temporary options.
Use Kerberos for authentication
Kerberos is another authentication type provided by Windows, and also works with your Active Directory. This authentication type is supported in Infor Lawson 10.
Stay in an unsupported authentication configuration
As of March 1, 2019, Infor will no longer be releasing Lawson patches that take LS/STS authentication method into account. This doesn’t mean your current versions of Lawson applications will stop working if you fail to move to ADFS at this time. It just means that you won’t be able to upgrade past a specific ESP for each product (10.0.9 for Lawson). When Infor sunsets the product versions that allow LS/STS, you will then be on an unsupported product version. It is looking like this will happen sometime early 2021.
Have more questions? Contact us and setup a free, no obligation call with our installer to answer all your questions.
On March 1, 2019, Infor will no longer support LS/STS authentication configuration for Lawson applications. The Infor recommended configuration will be to use Active Directory Federation Services (ADFS) for Single Sign-On (SSO) authentication. To learn more about ADFS, check out our other articles on the topic:
Here are some pro tips to help you prepare for your ADFS implementation.
Version compatibility is important
Before you begin your ADFS implementation, it is important that you verify component compatibility. Check the Lawson compatibility matrix for which version of ADFS is compatible with your versions of Lawson and Ming.le. You must also verify that the version of ADFS you are installing is compatible with your version of Active Directory. Additionally, you will need a minimum Windows Server version of 2012R2 on the server that is hosting ADFS and your domain controllers.
You might need a new server(s)
The ADFS installation for Infor Lawson applications also requires Infor Federation Services (IFS) to be installed on the same server. If you are not prepared to host IFS on a shared ADFS server, you will need to stand up a new Windows server dedicated to ADFS/IFS for Infor applications.
There will be small changes in user maintenance
ADFS is an authentication method, and user maintenance will change slightly. For instance, you will be able to disable users right in ADFS rather than having to do it in Lawson Security. Also, there will be a new identity to maintain in Lawson Security. When you implement ADFS, you will need to import all your users into IFS. However, implementing ADFS will not change the user authorization tools. You will still use Lawson Security Administrator (LSA) or Infor Security Services (ISS) to maintain users and roles, and those roles will work the same.
SSL is required for Infor Lawson applications
All of your Lawson web applications must use HTTPS to be able to implement ADFS. If your web applications are not currently using HTTPS, it is recommended that you make this change prior to implementing ADFS. You will need to choose a certificate authority (CA) and install certificates at each endpoint.
You need a SQL Server to host IFS databases
IFS will create new SQL Server databases, so you will need to have a SQL Server to host those. You can use a shared database server for this, such as your server that hosts Ming.le data or the server that hosts your Lawson data.
Have more questions? Contact us and setup a free, no obligation call with our installer to answer all your questions.
https://www.nogalis.com/wp-content/uploads/2019/02/Five-Things-You-Need-to-Know-About-Implementing-ADFS-For-Your-Infor-Lawson-Applications.jpg451495Angeli Mentahttps://www.nogalis.com/wp-content/uploads/2013/04/logo-with-slogan-good.pngAngeli Menta2019-02-20 07:23:302019-02-21 16:43:40Five Things You Need to Know About Implementing ADFS For Your Infor Lawson Applications
On March 1, 2019, Infor will no longer support LS/STS authentication configuration for Lawson applications. The Infor recommended configuration will be to use Active Directory Federation Services (ADFS) for Single Sign-On (SSO) authentication. To learn more about ADFS, check out our other articles on the topic:
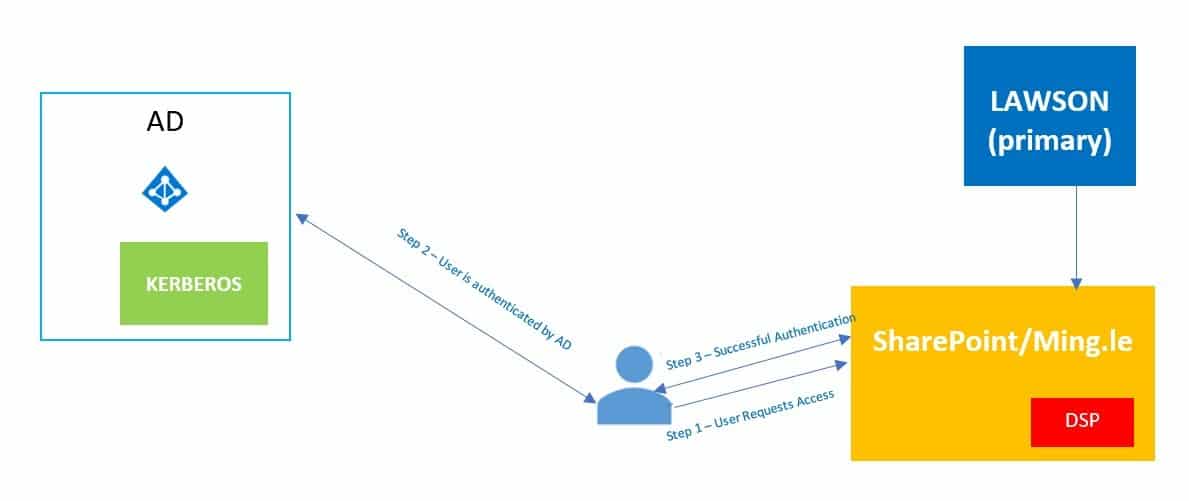
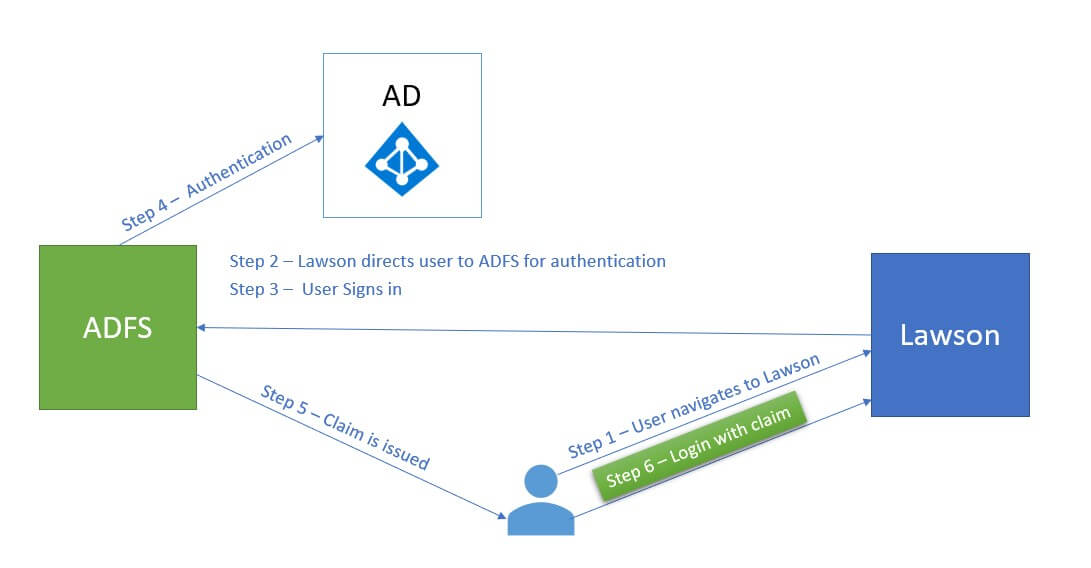
Active Directory Federation Services is a Single Sign-On service provided by Microsoft. It runs on Windows Server, and provides users with the ability to sign on with one set of credentials across applications.
How does ADFS work with Lawson?
Why change our authentication method?
Although there will be some work up front to modify your configuration from LS/STS to ADFS, using ADFS for SSO authentication is actually beneficial to your organization. It is more secure because Infor applications will never have access to a user’s password. It is also a bit easier to maintain your Infor users in ADFS, in that you can enable/disable the users right within Windows instead of having to do it in Lawson Security. Additionally, implementing ADFS will open up other Microsoft security components, such as two-factor authentication.
Busting Myths
There are some common misconceptions revolving around the implementation of ADFS for your Infor Lawson application. Hopefully these explanations will help dispel the confusion.
MYTH: We can use our organization’s current ADFS installation
Infor Federation Services (IFS) must be installed on the same server as ADFS. So, you may need to have a dedicated server for ADFS for Lawson. Also, your Infor Lawson applications cannot be hosted on the same server as ADFS. If you are installing a new instance of ADFS, make sure that it is compatible with your current version of Active Directory
MYTH: We don’t need SSL to implement ADFS
ADFS requires all of your Infor Lawson applications to use SSL (Secure Socket Layer). You will need to select a Certificate Authority (CA), and install certificates at each web endpoint. If your current Lawson web applications are not using SSL, you will need to convert them before you begin the ADFS installation/configuration.
MYTH: Our organization has to begin using ADFS for everything
The ADFS implementation is limited to Lawson and does not need to be part of any other application in your organization. A Windows server will host ADFS solely for Lawson and can be segregated to just this specific use without affecting anything else within the organization.
MYTH: The change is transparent to users
The look & feel of your Lawson web applications will remain the same, but the way users log in will change. LS/STS username format is currently “username”. When you switch to ADFS, users will log in with format “username@domain.com”. Also, keep in mind that if you have to update to a compatible ESP in any of your applications, there may be some slight changes in what the users see on the forms they use. Make sure this is done well in advance so the ESP can be tested thoroughly.
MYTH: Infor won’t support us after March 1, 2019
As of March 1, 2019, Infor will no longer be releasing Lawson patches that take LS/STS authentication method into account. This doesn’t mean your current versions of Lawson applications will stop working if you fail to move to ADFS at this time. It just means that you won’t be able to upgrade past a specific ESP for each product (10.0.9 for Lawson). When Infor sunsets the product versions that allow LS/STS, you will then be on an unsupported product version. It is look like this will happen sometime early 2021.
MYTH: User maintenance in Lawson Security is going to change
ADFS is an Authentication Method, while Lawson Security is an Authorization Method. So, you will continue to use Lawson Security Administrator (LSA) or Infor Security Services (ISS) to maintain users and roles. The ADFS authentication will not impact these roles at all.
MYTH: We use IPA, so we will have to update Landmark too
Infor Lawson products are actually the only products that allow LS/STS authentication method. So, you will not need to make any updates to your Landmark products, including IPA.
Contact us when you are ready for your move to ADFS. Our expert installers at Nogalis can make the process simple and pain-free.
https://www.nogalis.com/wp-content/uploads/2019/02/Seven-Myths-About-Implementing-ADFS-For-Infor-Lawson.jpg450495Angeli Mentahttps://www.nogalis.com/wp-content/uploads/2013/04/logo-with-slogan-good.pngAngeli Menta2019-02-18 08:28:062019-02-21 16:42:51Seven Myths About Implementing ADFS For Infor Lawson
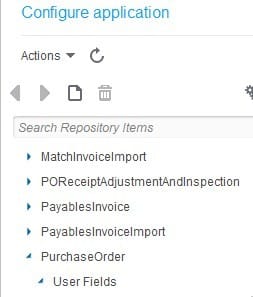
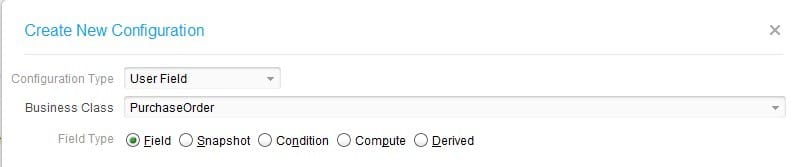
Find the name of the Form and the Business Class that you want to add the field to (Ctrl-Shift-Click on any field on the form)
Log into Rich Client and go to Start > Configure > Application (make sure that you have been granted access to Configuration Console)
Find your Business Class, and click “User Fields” under the class
Click the “blank paper” icon to add a new user field
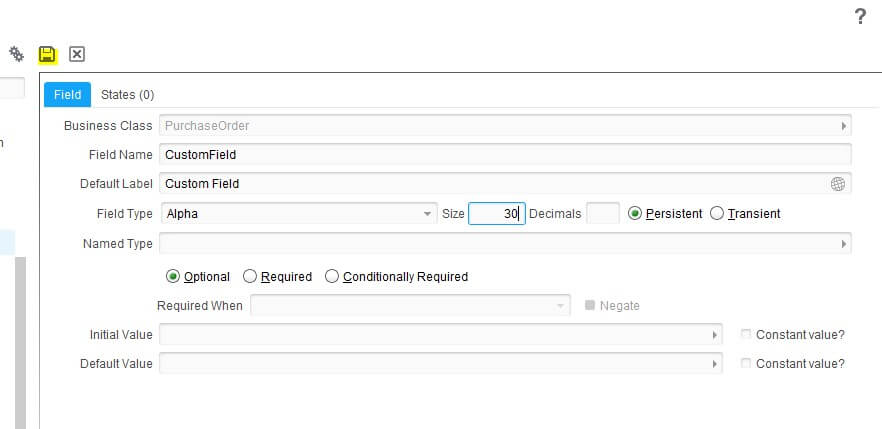
Give your user field a meaningful name (no numbers or special characters allowed, and the field name must begin with an upper-case letter)
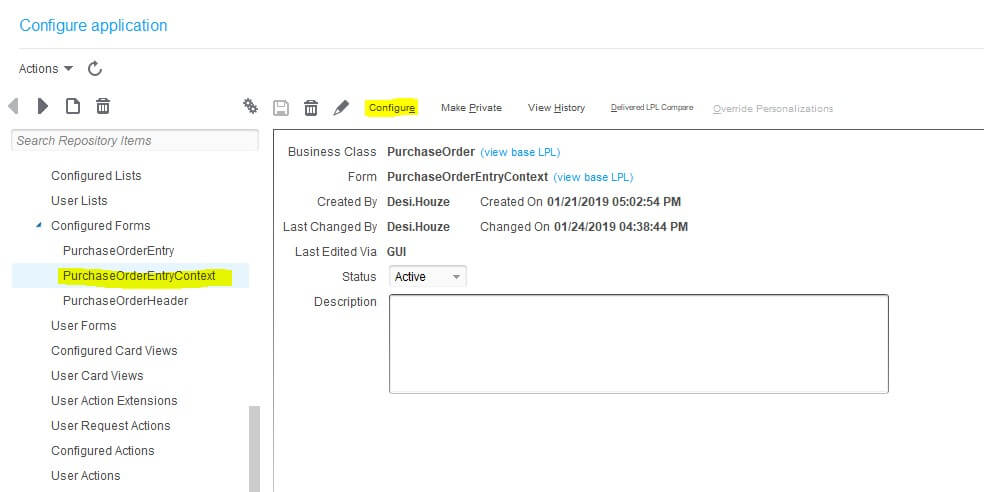
Next, go to configured forms and find the form name that you noted earlier
If this form has never been customized, you may need to click the blank paper icon to add it to the Configured Forms list
Once the form has been added as a configured form, click on the form name, then click “Configure”
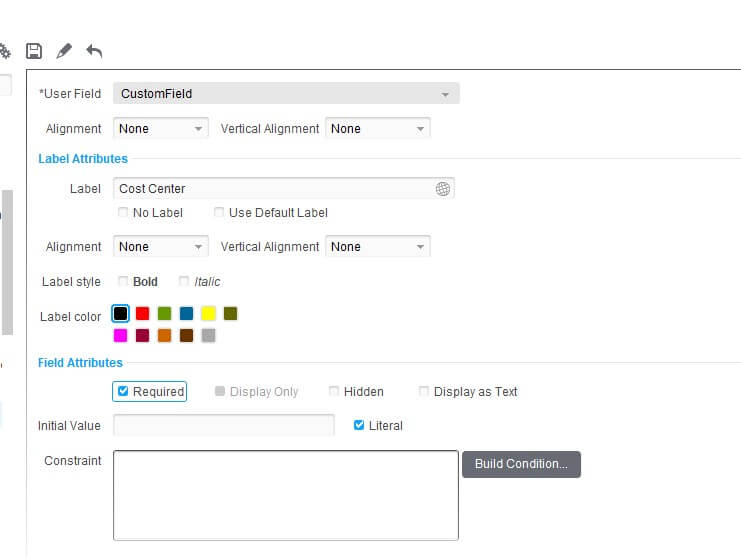
Navigate to the location where you want to add the user field
Click the blank paper and select “User Field”
Configure the user field for the form
Click “Save” and verify that the user field is now on your screen
https://www.nogalis.com/wp-content/uploads/2019/02/Adding-a-custom-field-to-a-form-using-Configuration-Console.jpg448490Angeli Mentahttps://www.nogalis.com/wp-content/uploads/2013/04/logo-with-slogan-good.pngAngeli Menta2019-02-11 07:23:342019-02-23 10:58:20Adding a custom field to a form using Configuration Console