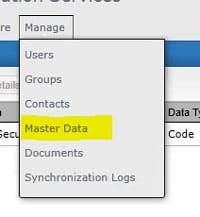
To mass assign security roles to users in IFS, first go to Manage > Master Data. Select “Security Role” and click “Details”. Choose the Security Role for which you want to assign multiple users. On the right side of the screen, click the “Add” button. A list of all users will be displayed. Select the users who should be in that role and click Apply and/or Ok. Click Save at the top.
https://www.nogalis.com/wp-content/uploads/2019/05/IFS-Security-Role-Mass-Assignment.jpg445490Angeli Mentahttps://www.nogalis.com/wp-content/uploads/2013/04/logo-with-slogan-good.pngAngeli Menta2019-05-14 08:02:522019-05-13 17:03:11IFS Security Role Mass Assignment
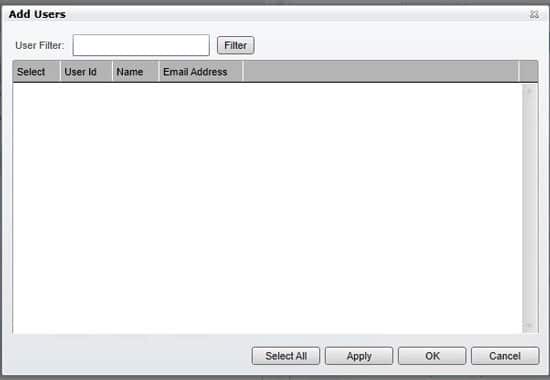
After your AD FS configuration, you will need to load users into IFS from LDAP. There is an option to search for each user and add them manually, but if you have a large group of Lawson users this can be time consuming. IFS also offers a mass upload using a CSV file. The CSV file needs to have a header, and the only value required is the samAccountName.
Create your CSV file, then go into Manage > Users in IFS. Click “Upload” and browse to your CSV file. Click Open and the users will be added into IFS.
https://www.nogalis.com/wp-content/uploads/2019/05/Upload-Users-to-IFS.jpg436480Angeli Mentahttps://www.nogalis.com/wp-content/uploads/2013/04/logo-with-slogan-good.pngAngeli Menta2019-05-13 13:21:112019-05-10 17:21:27Upload Users to IFS
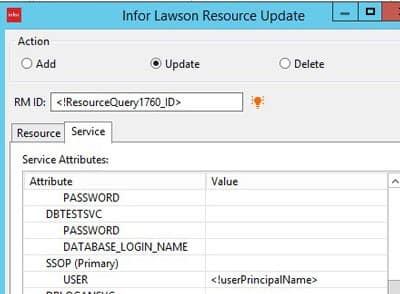
Once your AD FS configuration is done, you’ll need to update the SSOP identity with userPrincipalName for all of your users in Lawson Security. IPA is a great tool for this task.
Some nodes that you’ll need include:
System Command – get AD users
Run a powershell command to get the samAccountName and userPrincipalName from Active Directory
Using the ID from your Resource Query, Update the SSOP service
https://www.nogalis.com/wp-content/uploads/2019/05/Using-IPA-to-Update-SSOP-Identity-after-AD-FS-Configuration.jpg439480Angeli Mentahttps://www.nogalis.com/wp-content/uploads/2013/04/logo-with-slogan-good.pngAngeli Menta2019-05-13 08:16:132019-05-10 17:16:58Using IPA to Update SSOP Identity after AD FS Configuration
First, ensure that the Transfer mode is set to Passive in File ⇨ Site Manager ⇨ Transfer Settings Passive mode is the recommended mode for client computers behind NAT or proxy. In active mode, the client must accept connection from the FTP server. In passive mode, the client always initiates the connection.
Change Maximum Simultaneous Transfers to 10 in Edit ⇨ Settings ⇨ Transfers
As the name suggests, this increases the number of concurrent transfers that can occur to 10.
If these tips do not improve your Filezilla transfer speed, it is probably due to some limit on your ISP or on the server you are connecting to. Some hosts place tight restrictions on FTP speeds so it may be worth contacting your ISP.
https://www.nogalis.com/wp-content/uploads/2019/05/How-to-Maximize-Filezilla-FTP-Transfer-Speed.jpg429470Angeli Mentahttps://www.nogalis.com/wp-content/uploads/2013/04/logo-with-slogan-good.pngAngeli Menta2019-05-11 09:04:232019-05-10 17:06:43How to Maximize Filezilla FTP Transfer Speed
After configuring LSF for AD FS, we encountered a 500 error after a login smoke test. The error was begin logged in SystemOut.log for our AppServer. The error message was:
[4/30/19 14:31:41:287 PDT] 000000e9 ServletWrappe E com.ibm.ws.webcontainer.servlet.ServletWrapper service Uncaught service() exception thrown by servlet SSOServlet: java.lang.NoClassDefFoundError: org.bouncycastle.x509.extension.SubjectKeyIdentifierStructure
To troubleshoot this, we first regenerated and reloaded the ADFS Certificate to the LSF IdP Certificate in ssoconfig. This did not resolve the issue, so then we checked the java policy files. It turns out that the policy files were out-of-date. You need to update the policy files in JAVA_HOME and WebSphere. First, download the latest policy files from Oracle and IBM, and the BouncyCastle policy file from the BouncyCastle website.
To determine the directories which need the replacement files, first open a command line as administrator and type “where java”. This will show you where your main install of java is located. Go to this directory, then jre/lib/security and replace local_policy.jar and US_export_policy.jar. The BouncyCastle jar file will be located at jre/lib/ext. Matching files must also be stored in your WebSphere java home. To figure out where this directory structure will be, open SystemOut.log and scan for the last time the AppServer was started. “Java Home” will be displayed there. The directory structure will be the same as your main java install.
Remember to backup/rename your old policy files and copy the new ones to these directories. You’ll have to stop your WebSphere services and kill all java processes before you can do this.
First, you’ll need to connect to your installed VMWare Client:
Now before connecting to the virtual server, right click the connection and select Microsoft Remote Desktop:
Once this is selected, you’ll be able to connect to the host Virtual machine and use VMWare as if it was Microsoft Native Remote Desktop Protocol.
One of the biggest advantages of this is being able to copy and paste files to and from the VMWare client using CTRL + C and CTRL + V.
The other Protocol settings can be used as well.
VMWare Blast is optimized for mobile cloud and consumes less CPU in case you’re trying to save battery life.
PCoIP may be better optimized for use when a poor internet connection but results will likely be equal to the other options.
https://www.nogalis.com/wp-content/uploads/2019/05/Modifying-VMWare-to-use-Microsoft-Remote-Desktop-Protocol-so-you-can-Transfer-Files-Easier.jpg428470Angeli Mentahttps://www.nogalis.com/wp-content/uploads/2013/04/logo-with-slogan-good.pngAngeli Menta2019-05-10 07:44:122019-05-09 10:44:39Modifying VMWare to use Microsoft Remote Desktop Protocol so you can Transfer Files Easier
Since Infor Process Designer is an open-ended visual design tool, different users can achieve the same end goal but in many different ways. While the flow might technically “work”, this level of design freedom usually leads to processes that are not as efficient as they could potentially be.
Here are some tips to keep in mind as you design your next flow:
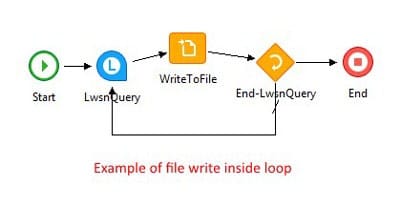
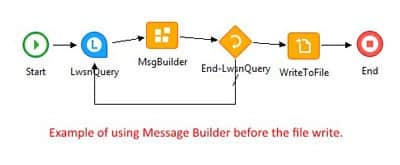
Use a MsgBuilder node instead of writing to file for each record
By using a MsgBuilder node, we can append all found records to a String in memory. We can then call the string when we need to write the records. This is much faster than individually writing each line, each time through the FileAccess node.
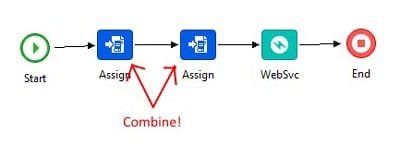
Merge Assign Nodes This is a common mistake in many processes. There is no reason two Assign nodes would have to line up one after another in a flow. You can simply use one Assign node for all your variables/javascript. More nodes in your flow results in slower speeds so you should always try to use as few nodes as possible.
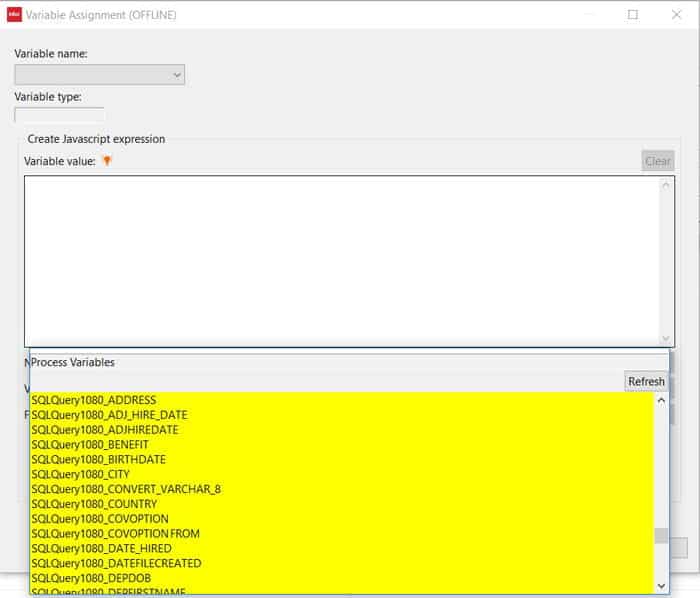
Remove Unnecessary Assign Nodes When a value is returned from a query or processing node, it is automatically assigned an internal variable name.
In the screenshot above, we see the values pulled from my SQL query have already been automatically assigned a variable. Therefore, there would be no point in having an Assign node to set SQL ADDRESS to my custom variable <!ADDRESS>. It would be better to simply call <!SQLQuery1080_ADDRESS> when needed as the variable has already been created for me.
Remote File Access When the Infor Lawson business applications and ProcessFlow are on the same server, file access is blazing fast since all the files are local. However, when IPA is on a separate server, the process slows down since the flow must now access the file across the network and not locally.
To mitigate this issue, make sure file access is done as efficiently as possible. Perhaps reach out to those in charge of network IT to see about reducing network lag.
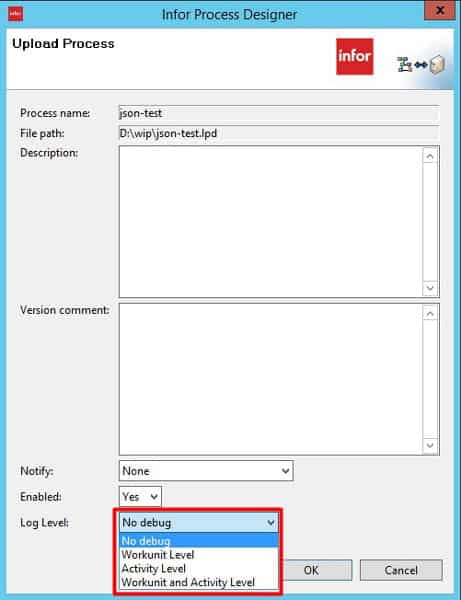
Upload the Process with Logging Off Process logging can negatively affect performance. Unless you are troubleshooting a problem, processes should be uploaded with Log Level: No debug
https://www.nogalis.com/wp-content/uploads/2019/05/Infor-Process-Automation-IPA-Best-Practices-and-Performance-Improvement-Tips.jpg432475Angeli Mentahttps://www.nogalis.com/wp-content/uploads/2013/04/logo-with-slogan-good.pngAngeli Menta2019-05-09 07:36:052019-05-08 13:36:17Infor Process Automation (IPA) Best Practices and Performance Improvement Tips
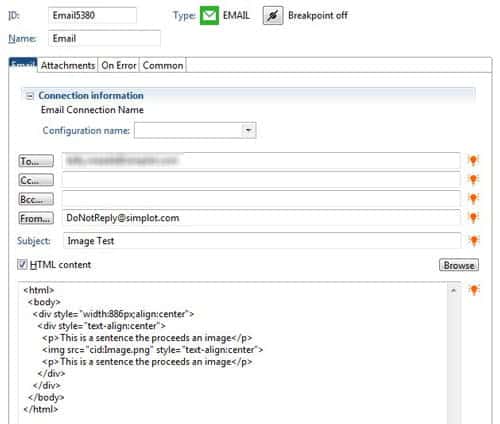
Using HTML or inserting images via the IP Designer Email node seems to be a common problem based on the number of forum posts on this topic.
Here are some of the solutions that have been proposed.
USING HTML
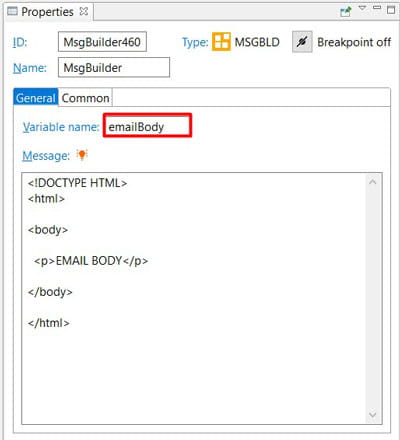
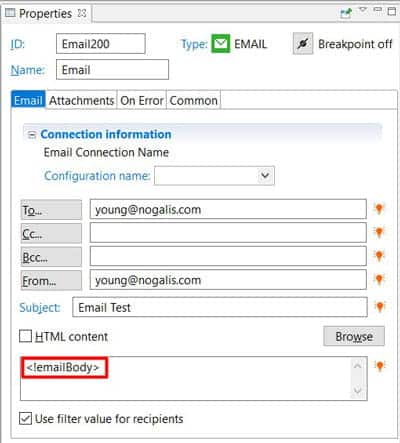
Based on the responses of senior IP Designer users, the gold standard for using HTML in your email is to write the HTML directly into a MsgBuilder node (https://www.nogalis.com/2017/09/12/ip-designer-series-message-builder-node/) so that we can call the MsgBuilder variable name in the email body of the Email node.
INSERTING IMAGES
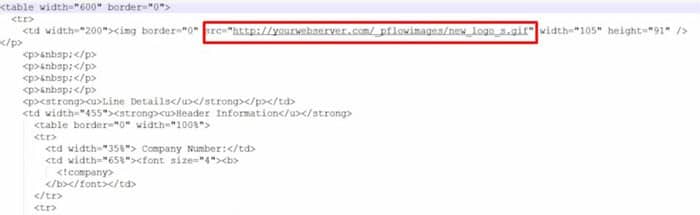
A simple way to insert images in emails sent by IP Designer Email node would be to compose HTML as shown above and bring in images from web servers.
Another way would be to store the image in the Lawson emailattachments directory in order to attach it in the Email node.In Windows the directory to store the images is: lawsondirectory/bpm/emailattachments In Unix: lawsondirectory/LPS/emailattachments/
https://www.nogalis.com/wp-content/uploads/2019/05/IP-Designer-Email-Node-Using-HTML-and-Inserting-Images.jpg440480Angeli Mentahttps://www.nogalis.com/wp-content/uploads/2013/04/logo-with-slogan-good.pngAngeli Menta2019-05-08 13:26:552019-05-07 18:28:59IP Designer Email Node – Using HTML and Inserting Images
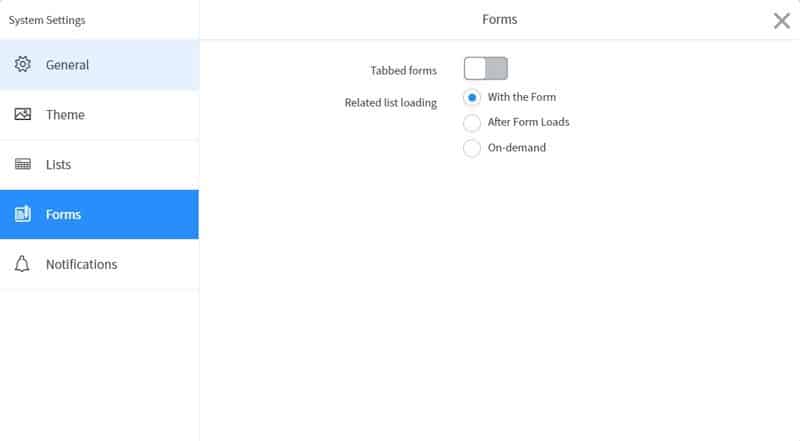
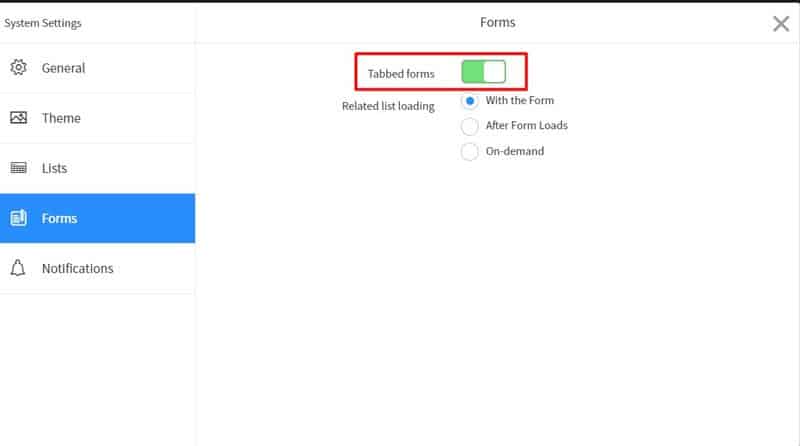
Performance degradation? Forms slow to load? Try following these steps: • Click the Settings Gear Icon on the top right of your ServiceNow screen, next to your name. Then, navigate to the Forms tab. • Changing the Related list loading from “With the Form” to “After Form Loads” for a slight improvement in performance. Changing to “On-Demand” can result in significant performance gains as this would change it so that records get loaded only upon click.
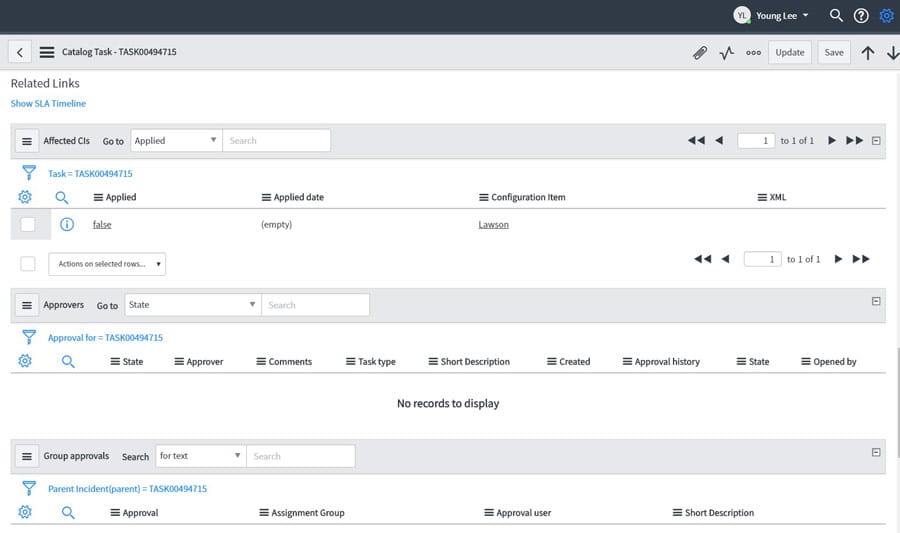
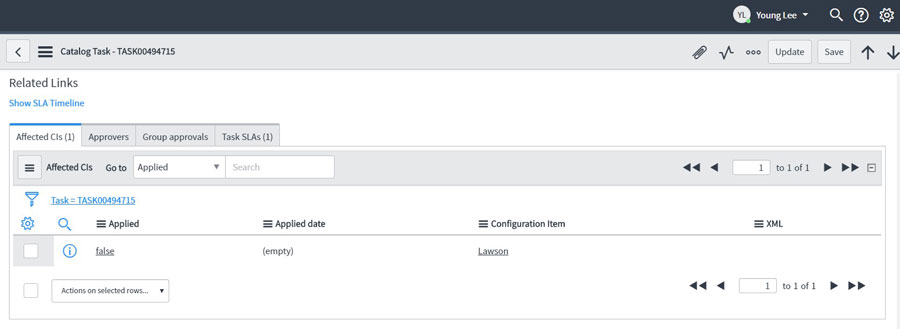
Change the form view to a cleaner tabbed format versus the normal lengthy vertical layout. From the same Forms tab in System Settings (refer to tip #1), we can turn on Tabbed forms to change to this view.
BEFORE: AFTER:
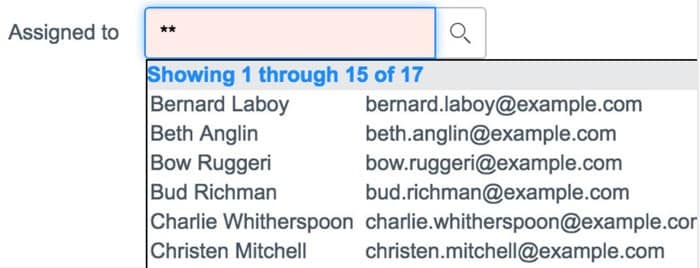
Using asterisks (*) and double asterisks (**) for Reference fields. In ServiceNow, searching for a record in a reference field will automatically use a “STARTSWITH” query.
This can cause some difficulties when trying to search for records.
The solution is to use an asterisk before typing in the search term. This will change the query to a “CONTAINS” search which makes searching for records a lot easier.
Also, you can also use double asterisks (**) to quickly return the first (up to) 15 records in the table.
ServiceNow Keyboard Shortcuts.
Quickly add attachments by simply dragging file to “Work notes” area.
Attaching files by clicking the paperclip icon and then browsing for the file is a slow process. You can simply drag and drop the file you want to attach into the Work notes box.
https://www.nogalis.com/wp-content/uploads/2019/05/5-ServiceNow-Tips-Tricks-I-Wish-I-Knew-When-I-Started.jpg439480Angeli Mentahttps://www.nogalis.com/wp-content/uploads/2013/04/logo-with-slogan-good.pngAngeli Menta2019-05-08 08:04:562019-05-08 14:27:425 ServiceNow Tips & Tricks I Wish I Knew When I Started!
The DECLARE statement is used in a SQL statement to declare a variable. The declared variable can then be set using SET statement. Once set, the declared variable can be referred by the SELECT statement.
The DECLARE statement can also be used to declare a DATETIME and the SET statement can modify this DATETIME with DATEADD. This allows us to avoid dealing with JavaScript datetime variables.
For our case, we wanted to query all individuals that were set to turn 18 years old within a year.
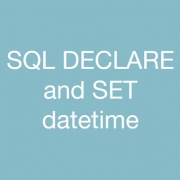
In order to do this, we first ‘DECLARE’d the variables we would need and modified them using SET:
Note: First argument of DATEADD function can be any accepted SQL interval (year,month,week,day,hour,second,etc.)
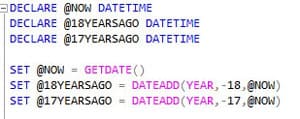
Now that our 3 variables had been set, we were able to refer to them in the WHERE portion of the SELECT statement:
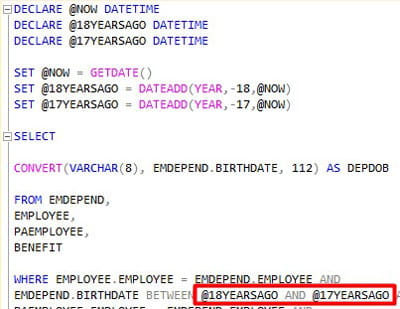
Full query with results:
By specifying the search range using DECLARE and SET, we are able to query the DOBs of just those users that are set to turn 18 years of age within a year of the query date.
https://www.nogalis.com/wp-content/uploads/2019/05/SQL-DECLARE-and-SET-datetime.jpg446490Angeli Mentahttps://www.nogalis.com/wp-content/uploads/2013/04/logo-with-slogan-good.pngAngeli Menta2019-05-07 14:21:362019-05-06 14:23:54SQL DECLARE and SET datetime