Lawson makes it incredibly simple to add users to its reporting wing LBI.
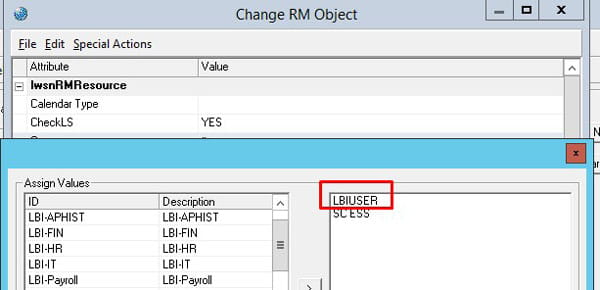
First what you want to do is add the LBIUser GROUP to the user in LSA:
This group may be spelled differently but typically it’s called LBIUSER and is defined when Lawson is first setup for your organization.
Once you add this group to the Lawson user. Make sure you save and clear your server cache.
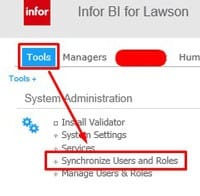
Log in to LBI, go to Tools, and under System Administration click “Synchronize Users and Roles”
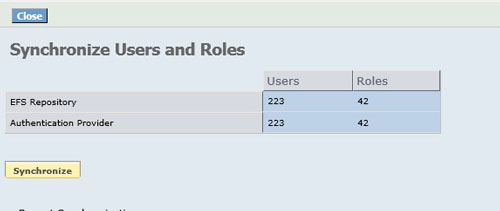
LBI typically auto-synchronizes once a day but you can manually do it now and you’ll notice the users and roles will be the same after your sync them.
The user should be able to login into LBI but likely won’t be able to access much if reports, dashboards, and links are assigned additional Lawson groups as a means of restricting access. Again, these are called “roles” in LBI but “groups” in Lawson.
There is also a matter of bursting reports to the user which is another form of security that will be outlined in another article.
https://www.nogalis.com/wp-content/uploads/2019/05/How-to-add-a-user-into-Lawson-Business-Intelligence.jpg431472Angeli Mentahttps://www.nogalis.com/wp-content/uploads/2013/04/logo-with-slogan-good.pngAngeli Menta2019-05-28 08:23:572019-05-30 10:06:06How to add a user into Lawson Business Intelligence
Infor Process Automation should be configured correctly to ensure proper functioning of other Lawson System Applications. Here are the official best practice IPA-LSF Server Configuration recommendations directly from Infor. (KB 1946828)
Recommended Configurations
JT-973173
This JT resolves a memory leak issue in the Event Manager Java Process. Not having this JT means the Event Manager Java Process will slowly grow in size and if left unchecked, can consume all RAM and even crash the LSF Server.
Remove lpsMaxHeap=XXXXX and lpsMinHeap=XXXXX from LAWDIR/system/bpm.properties
These settings are only required when using JNI.
Set useLPSBridgeSocket=true in LAWDIR/system/bpm.properties
NOTE: The use of the LPS Bridge Socket connection means LSF batch/online programs will no longer initialize a JVM, it will simply make a socket connection to the Event Manager process to make the request.
Set Windows pagefile on LSF server to 32 GB
Additional Recommendations for Infor Cloud Clients
Verify and ensure that lpsHost=inforbclm01.inforbc.com
NOTE: If this setting is not pointed at the internal domain, a grid session memory leak can occur in Event Manager on the LSF server
NOTE: Changes to this file should be made by executing pfserv config lps and they require a restart of LSF Process Flow and LSF Web Application Servers.
Additional Recommendations for LSF on LINUX
Ensure LSF JT-875069 is applied to the LSF system
Add “useLPSLocalServices=true” to LAWDIR/system/bpm.properties
Follow KB 1936921 which has two process definitions files used for synchronizing services from IPA/Landmark to LSF
In the GEN data area of the Landmark Rich Client, navigate to ConfigurationParameter BusinessClass and add: Component=ipa, Name=useRMIWebServlet, Value=true
Configure LSF to look at IPA Services in the LOGAN database instead of connecting to IPA. This requires LSF JT-875069 which allows you to add “useLPSLocalServices=true” in bpm.properties. This also requires the use of a ServiceSyncFlow to move the services from IPA to LSF. To implement this procedure, please follow instructions on KB 1936921.
https://www.nogalis.com/wp-content/uploads/2019/05/IPA-LSF-Server-Configuration-Recommendations-from-Infor.jpg429470Angeli Mentahttps://www.nogalis.com/wp-content/uploads/2013/04/logo-with-slogan-good.pngAngeli Menta2019-05-23 08:33:352019-05-22 13:33:52IPA – LSF Server Configuration Recommendations from Infor
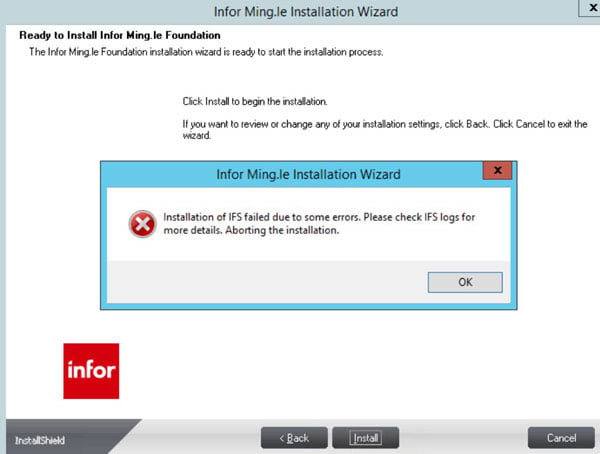
During a recent IFS install we encountered an install failure and the error message/return code was blank. The setup_log.log file said “Error: IFS -DoInstall failed with a return code of”. We noticed that the setup_log.log claimed that it had created the new database successfully, but the database was not there. After much troubleshooting, we finally realized that we needed some inbound/outbound firewall rules for our IFS database instance. The interesting thing is that the install wizard made it past the database connection screen, but once we added those firewall rules, we were good to go.
https://www.nogalis.com/wp-content/uploads/2019/05/IFS-Installer-Fails-with-No-Error-Message.jpg431472Angeli Mentahttps://www.nogalis.com/wp-content/uploads/2013/04/logo-with-slogan-good.pngAngeli Menta2019-05-21 08:23:092019-05-20 12:37:11IFS Installer Fails with No Error Message
Active Directory groups can be added in IFS to use for synchronization and automated role assignment. To add a group to IFS, navigate to Manage > Groups. Click the add button to add a group, or click on a group in the list to update it. Selecting the “Sync users” checkbox means that users from that AD group will bey synchronized with IFS each time a sync is done. You can also auto-assign roles to users in the AD group by going to Manage > Master Data. Select Security Role, then Details. On the left side, select the role you want to assign. On the right side, click the Groups tab, and select the add button. Choose the group(s) for which that role should be assigned. Select Apply and/or Ok, then click the save button at the top. The next time you have a scheduled sync, all users in that AD group will be assigned the role(s) you defined.
https://www.nogalis.com/wp-content/uploads/2019/05/Managing-Groups-in-IFS.jpg436480Angeli Mentahttps://www.nogalis.com/wp-content/uploads/2013/04/logo-with-slogan-good.pngAngeli Menta2019-05-20 07:08:502019-05-19 21:49:13Managing Groups in IFS
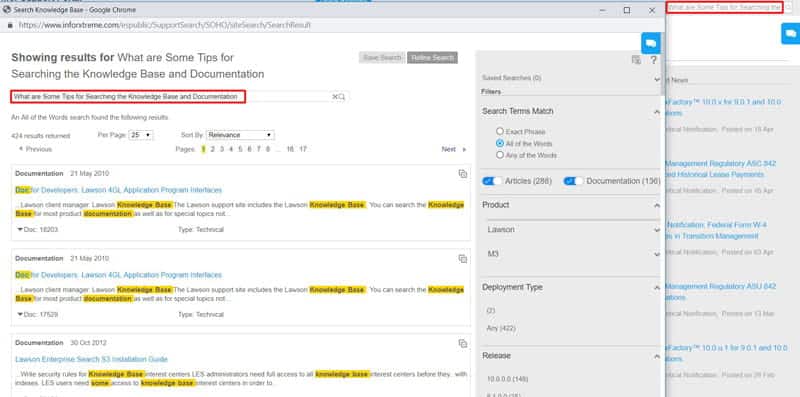
Troubleshooting Infor/Lawson issues can be tricky at times due to the scarcity of resources online. Finding an Infor specific solution through a standard Google search is usually fruitless. In these cases, the absolute best help usually comes from an Infor Knowledge Base (KB) article or actual Infor documentation as the instructions there are coming straight from the horse’s mouth.
Unfortunately, it can be quite tricky to use the search to find what you are looking for. Even when I know exactly what I’m looking for, I have seen the search results display wildly irrelevant articles. Even when I type the exact title of the KB article, the results sometimes do not show it.
Here are some tips and tricks to help you search through Infor’s Knowledge Base (Full article: KB 1182904)
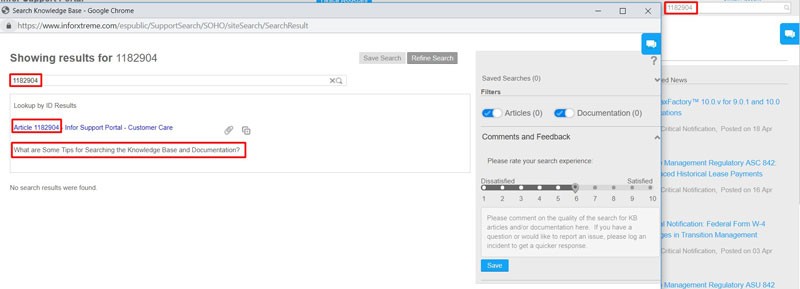
Do you know the ID Number? If you have the incident number, KB article ID, or Documentation topic ID on hand, there is no need to mess with search terms at all. Simply search the number and just the number itself to find your article.
YES NO
Try to favor Singular words over Plural in the Search Phrase Infor recommends using singular words in your search phrase for better search results.
Using Wildcards in the Search Phrase
There are two wildcard characters (* and ?) available to use in the search phrase to expand your results. Wildcard characters serve to complete a word when you are not sure of the entire word. Wildcard characters apply to single words and not the entire phrase.
• Asterisk (*): Adding this to a word will add zero or more characters to the word to look for all words that include the characters provided. For example, searching for term “account*” will return results that start with account but can end with any number of letters after account. Words such as accounts, accounting, accounted would all be included in the search results.
• Question mark (?): Adding this to a word will add one character to the word to look for all words that include the characters provided. For example, searching for term “?ate” will return results that end in ate but can start with any one letter. Words such as late, date, rate, gate would all be included in the search results. If it was an asterisk instead (*ate), words such as elucidate, satiate, plate would also be included.
Note: if you use the * in a word in the search phrase and the search engine finds too many matches, you may get no results returned.
Using Special Characters The only special characters that are considered by the search are:
• slash (/)
• dash (-)
• underscore (_)
All other special characters (such as !,@,#,$,&) will be replaced by a space when the search is performed. These are not searchable.
Types of Searches If your search contains just one word, regardless of the setting of the Search Exact Phrase checkbox, an “Exact Phrase” search will be performed. Only those KB articles/Documentation topics that include the word, a form of the word, or a synonym for the word, will be included in the search result. If your search phrase is “execute”, you should expect to see KB articles/Documentation topics including: execute, executed, executing, run, runs, and running in the search result.
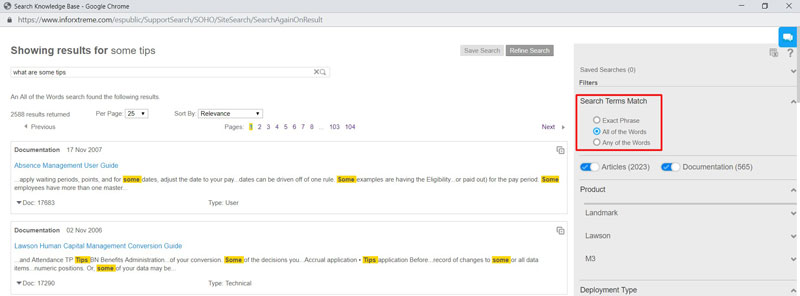
If your search contains more than one word and Search Exact Phrase = unchecked, an “All of the Words” search is performed. If there is at least one result that contains all of the words in the search phrase, then the results are displayed. If there are no results that contain all of the words in the search phrase, then an “Any of the Words” search will be performed and all of the KB articles/Documentation topics that contain at least one word in the search phrase will be displayed in the search result.
If your search contains more than one word and Search Exact Phrase = checked, an “Exact Phrase” search is performed. If there is at least one result that contains the exact phrase, then the results are displayed. If there are no results that contain the exact phrase, then an “All of the Words” search is performed. If there is at least one result that contains all of the words in the search phrase, then the results are displayed. If there are no results that contain all of the words in the search phrase, then an “Any of the Words” search will be performed and all of the KB articles/Documentation topics that contain at least one word in the search phrase will be displayed in the search result.
Refer to the Search Terms Match filter on the search result page to see what type of search was performed:
Search Exact Phrase Checked vs Unchecked
If Search Exact Phrase is selected:
• Automatic spell correction is not performed. The search terms are searched as-is.
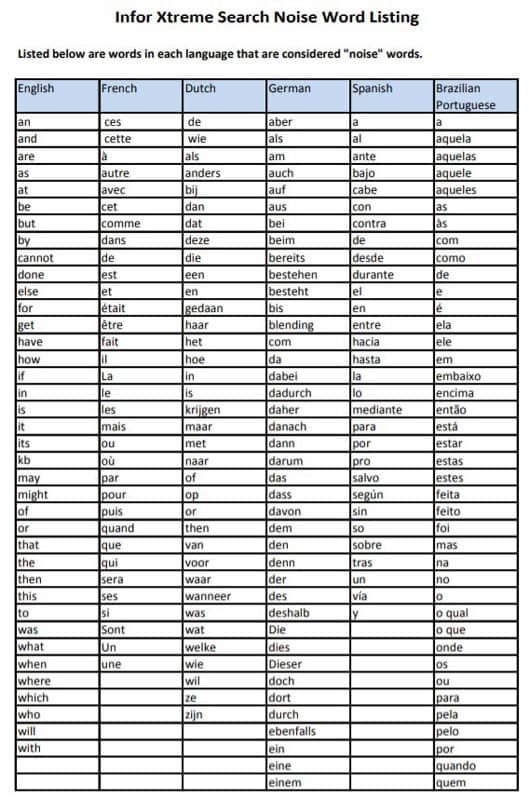
• “Noise words” are not removed from the search phrase.
If Search Exact Phrase is NOT selected:
• Automatic spell correction is performed. There will also be a “Search instead for” option to search the original phrase with no correction.
• “Noise words” are removed from the search phrase.
You can surround a word with double quotes (“”) to avoid auto spell correction and noise word removal. • The numbers zero through nine (0, 1, 2, 3, 4, 5, 6, 7, 8, 9) are also considered noise words.
The individual letters of the English alphabet are also considered noise words.
Infor General Recommendations
Use the Advanced Search options on the search criteria page only if you know for certain that the search result should include results with only those criteria.
On the search criteria page, select multiple product lines if you are unsure where an issue might originate.
When conducting a search, start with a simple search phrase and if too many results are returned, try adding more words to constrain the search result.
On the search result page, only use the filters on the right if you are certain that the search result should be filtered by those selections. If you are uncertain, you might consider modifying your search phrase.
https://www.nogalis.com/wp-content/uploads/2019/05/Infor-Knowledge-Base-and-Documentation-Search-Tips-and-Tricks.jpg428470Angeli Mentahttps://www.nogalis.com/wp-content/uploads/2013/04/logo-with-slogan-good.pngAngeli Menta2019-05-18 09:02:392019-05-17 15:08:37Infor Knowledge Base (KB) and Documentation Search Tips and Tricks
When working with Infor Process Automation (IPA), code or programs can be executed remotely on the Lawson System Foundation Server through these four nodes:
System Command Node
File Access Node
Resource Query Node
Resource Update Node
These nodes work by making a connection (via RMI call) to a java.exe process running on the Lawson System Foundation Server. Therefore, it is vital that the process owner has the proper access to run these commands.
Follow the instructions below to configure your LSF system so these processes will be owned by a user that has the necessary access:
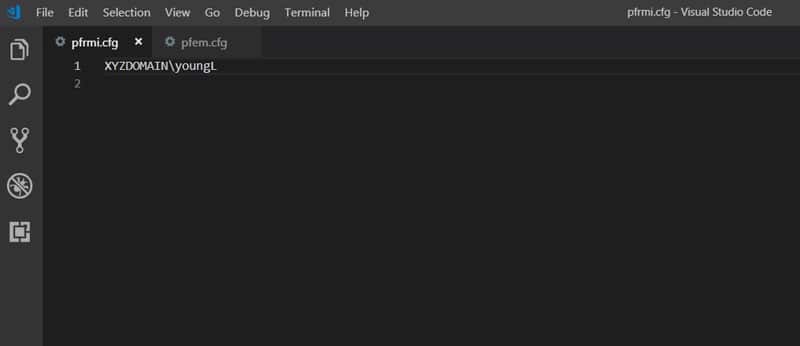
Create two files (pfrmi.cfg and pfem.cfg) in %LAWDIR%/system directory. The next time the process flow is restarted, the java.exe process will refer to these files to specify which user will start the java.
Both files should be identical and have just two lines each: line 1: LAWSONUID DOMAIN\accountname line 2:
LAWSONUID DOMAIN should be replaced with your own domain and accountname should be replaced with your own account name. This is the user you are designating to run the java command. This user needs to have the proper access to run those commands. This domain/accountname combo needs to be a valid user defined in the LSF Environment Service Identity.
The second line needs to be a blank line. (Only if LSF system is running on Windows. No blank second line needed for UNIX)
line 1/line 2 are there to show you the line numbers. The actual words “line 1” and “line 2” should not be in the files.
https://www.nogalis.com/wp-content/uploads/2019/05/Setting-Up-LSF-Java-User-Permissions-for-IPA.jpg428470Angeli Mentahttps://www.nogalis.com/wp-content/uploads/2013/04/logo-with-slogan-good.pngAngeli Menta2019-05-17 08:40:032019-05-16 12:41:41Setting Up LSF Java User Permissions for IPA
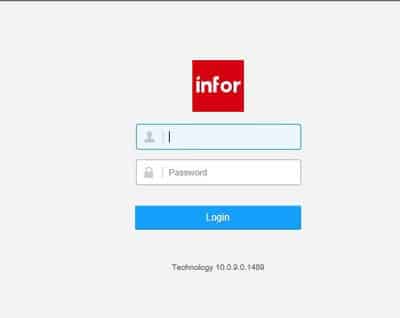
There are several reasons why one would want to customize the initial Infor portal log-in screen:
Maybe you don’t like the color scheme or would like to replace the logo with your company’s logo. Maybe your users are forgetting their passwords and you would like to include a “Forgot your password?” link on the page. Maybe the log-in box area is too small for your liking.
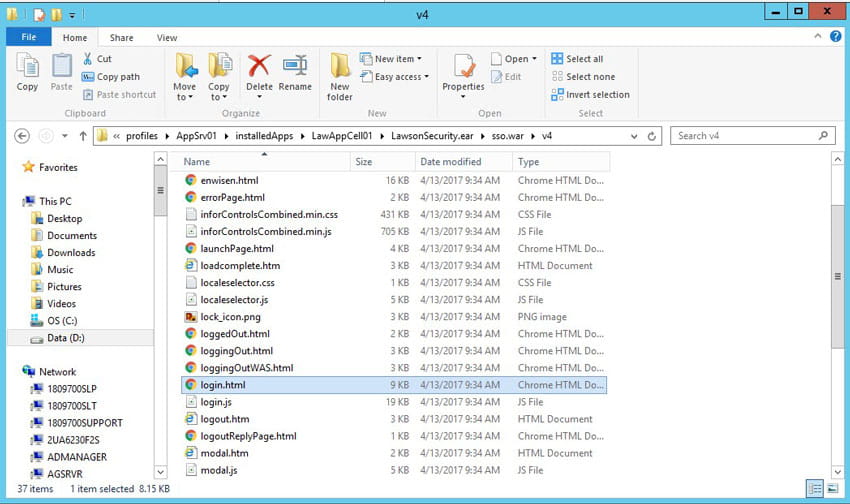
Whatever the case, you can use HTML to edit this log-in page as needed. The HTML page will be in IBM/Websphere directory. You will be able to locate login.html in the …\sso.war\v4 directory.
Open up login.html in an IDE of your choice and create HTML changes accordingly.
https://www.nogalis.com/wp-content/uploads/2019/05/How-to-Edit-the-Infor-Initial-Portal-Log-in-Screen.jpg428470Angeli Mentahttps://www.nogalis.com/wp-content/uploads/2013/04/logo-with-slogan-good.pngAngeli Menta2019-05-16 12:03:442019-05-15 13:32:05How to Edit the Infor Initial Portal Log-in Screen
This 1 hour, interactive briefing from Infor provides an overview of the best practices for performance tuning your IPA process flows, grid tuning considerations, and tips to leverage the most from your system.
IPA Settings Tuning
Basic tips for improving performance:
Ensure you are on the latest release of Landmark Environment.
Upgrading your system to a newer release of Java will often result in performance improvements.
Core Pool Size: pfi.dispatcher.CorePoolSize setting within Grid determines how many simultaneous workunits can process at a time. Rule of thumb is to start by setting this value to the number of CPU Cores in your Landmark Server. (8 core CPU = 8 max workunits) In order to fully optimize, you can start simultaneous flows equal to your server’s cores and check Task Manager’s Performance tab. For example, if only 50% of your CPU is being used with 8 simultaneous flows in progress, you can probably safetly increase the maximum workunits to 12 or even 16 for improved performance.
Max Heap: grid.jvm.maxHeapMB setting within Grid sets the max amount of server RAM a particular Grid Node can use for processing. When setting this value, be aware of how much total RAM is available to use on the server. All the Max Heap sizes for all Grid Nodes, Operating System Memory, and Memory Footprint of other programs needs to be less than the total RAM of the server. The Max Heap should be set as high as possible with these considerations in mind.
LmrkDeferred Node: When installing Landmark, some grid deployments create this LmrkDeferred grid gode which combines the functionality of Async and IPA into one node. You should not be running Process Automation with this grid node. Infor recommends that the Async node and IPA node be broken out into their own grid nodes.
Configure the system so that there is only one IPA Grid node per Data Area that processes workunits.
Process Tuning Basic tips for improving processes/flows:
Most important factor is the number of nodes. Try to minimize the number of nodes in your flow as flows take approximately 5-20ms time between nodes and 2-5ms time per variable assignment. An important tip when trying to reduce nodes is to remember that values returned from a query or processing node will automatically be assigned an internal variable name that we can refer to. There is no need for an additional assignment.
When using a query to cycle through records and write to a file, using a MsgBuilder versus a FileAccess or Assign node is more efficient as it is keeping the records in memory to write all at once at a later time. FileAccess in between a query is the most inefficient as it requires opening and appending onto a file once for every record encountered.
Turning on logging will decrease flow performance so it should only be turned on when troubleshooting flow failure or performance issues. When a flow is failing, turn on Workunit and Activity Logging and turn this off when done troubleshooting. For performance issues, run the flow with Workunit only logging turned on.
When creating a large csv file, consider using SysCommand node instead of writing to a file by looping through records.
For more details and the most recently updated KB articles, refer/subscribe to: KB 1671693 – IPA Support Best Practices
https://www.nogalis.com/wp-content/uploads/2019/05/Top-Takeaways-from-Process-Automation-Performance-Considerations-and-Best-Practices-Infor-Webinar-min.jpg427470Angeli Mentahttps://www.nogalis.com/wp-content/uploads/2013/04/logo-with-slogan-good.pngAngeli Menta2019-05-16 08:19:082019-05-15 13:21:41Top Takeaways from “Process Automation – Performance Considerations and Best Practices” Infor Webinar
You may run into this error at some point in GL40.1:
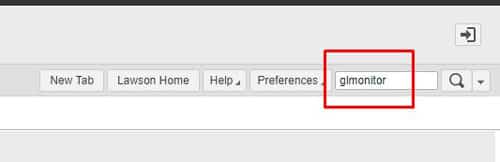
Fortunately, there’s an easy fix to this. First login to Lawson portal and search GLMONITOR:
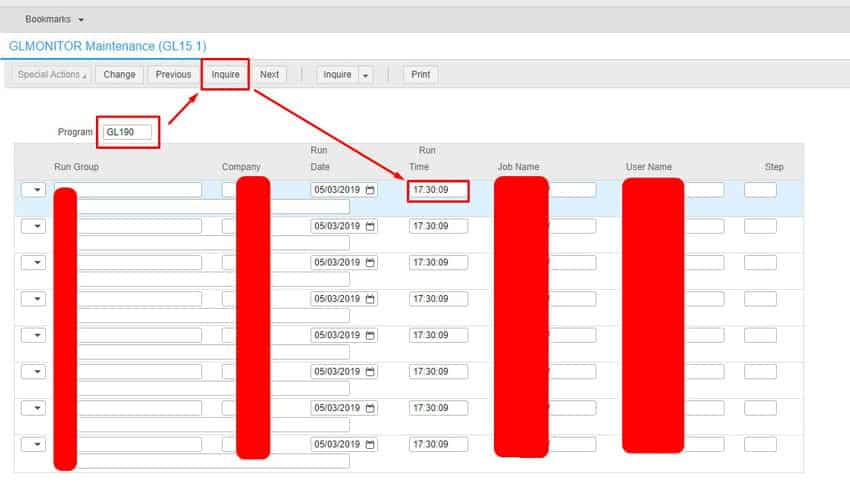
In GLMONITOR, type “GL190” and select Inquire. If you get results and notice the run time, the process is in fact still running and causing the issue with GL40:
Go to job scheduler by opening LID and typing in jobschd >> F7 + A to select all users >> Then W to go to waiting screen.
Look for any GL190 jobs running and verify the User Name is the same one in GLMONITOR when inquiring on GL190 program. Check the error and if its safe to recover, recover it and let the job complete.
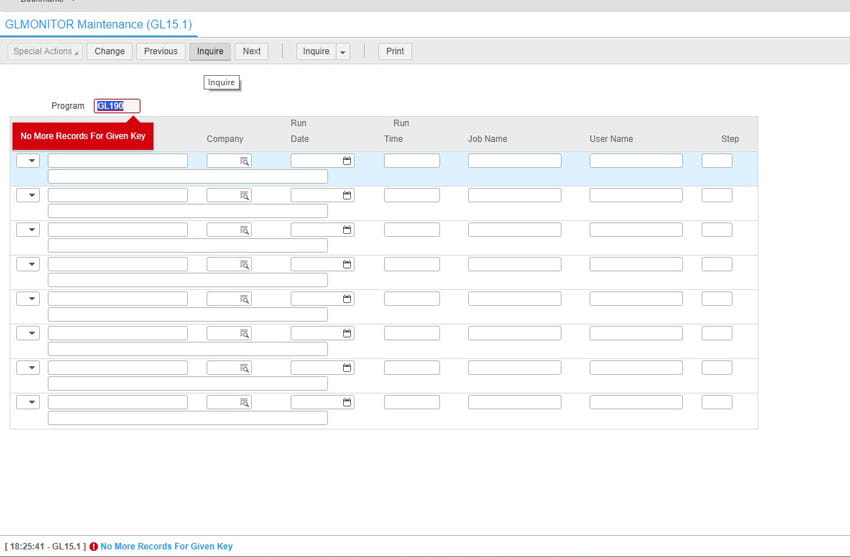
Go back to GLMonitor and inquire on GL190 to verify the job is no longer running:
Go to GL40.1 and release your Journal Entries. This should solve the error. Good luck!
https://www.nogalis.com/wp-content/uploads/2019/05/Resolving-Cannot-run-this-program-while-GL-190-is-running-error.jpg430475Angeli Mentahttps://www.nogalis.com/wp-content/uploads/2013/04/logo-with-slogan-good.pngAngeli Menta2019-05-14 09:53:452023-02-27 16:31:34Resolving “Cannot run this program while GL 190 is running” error when trying to release journal entries in GL40.1