Creating an LBI Smart Notification Series – Creating a Smart Notification (Part 2)
LBI Smart Notifications are reports that are sent directly to users for reviewing vs a user logging into LBI to manually view a report. In this section we will first start off with an Intro to creating a Smart Notification. See Part 1 titled: “Creating an LBI Smart Notification Series – Creating an InfoSet (Part 1)”
- Login into LBI (admin permission required) >> go to Tools >> Select Smart Notification
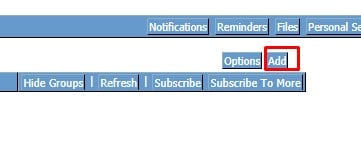
- In Smart Notification, select Notifications at the top
- To create a new Smart Note, click Add
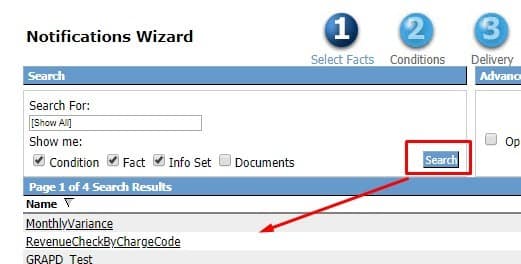
- Smart Notification Wizard will pop-up and starts at step 1 (Select Facts)
- The Facts section is where you would connect the dataset (or InfoSet) to the notification (this can also be a document among varios other types of data).
- An InfoSet is most commonly an SQL query or stored Proc that gathers data from a database.
- For this example, we will assume you have an InfoSet already created. View your InfoSets by clicking Search
- For our example we will be selecting the MonlthyVariance InfoSet and then select Range
- At the bottom of the next page choose Select >> Add >> Ok at the very bottom
- At the bottom under My Selections you should now see your InfoSet for step 1
- Now click Next or select step 2 Conditions
- Conditions can be added with the Add button. This lets you tailor the data to your liking. This can also be done on the InfoSet side when writing a query or stored proc.
- Click Next again or select step 3 Delivery
- Delivery typically is done through the Device tab which are setup email addresses in Smart Notes (See article titled “How to setup a LBI smart note delivery device”)
- The Bursting tab is the alternate method. In the Bursting tab select the InfoSet, and the column to burst on which is typically a list of email addresses.
- Schedule tab is similar to Device, except on a schedule which can be set elsewhere for the Notification.
- Click Next again or select Step 4 Related Info
- Related Info lets you link other LBI reports, shared documents, deploy in a pre-made formatted template among other customizations. This may be covered in more depth in a future article.
- Click Next again or select Step 5 Save
- This is where you Name, describe, set Home Page Group for your Notification.
- You can also Preview, set Status, and add additional Permissions if needed.
- Click Save New Item to create your new notification and view it in the Notifications Tab.
Hope this was helpful! Good luck!


